A bottle filling PLC program is a step sequence: index the conveyor until a bottle reaches the fill station, stop the conveyor, open the fill valve for a set time, cap the bottle, then release it and index the next one. Each step waits for one condition — a sensor or a timer — before it hands off to the next, and a fault step catches jams, overfills and missing caps. Get that index → stop → fill → cap → release loop right and you have the backbone of almost every packing machine on the floor.
This guide builds the sequence one piece at a time: the I/O you need, the state diagram, the fill-valve rung, a fill-cycle timing diagram, the full flowchart with fault handling, the pitfalls that bite beginners, and when to swap a timer for a flow meter.

The I/O for a bottle filling machine
Before any logic, list your inputs and outputs. A minimal fill station has one input that matters — a bottle-present sensor — plus start/stop buttons, and three outputs: the conveyor motor, the fill valve, and the capper.
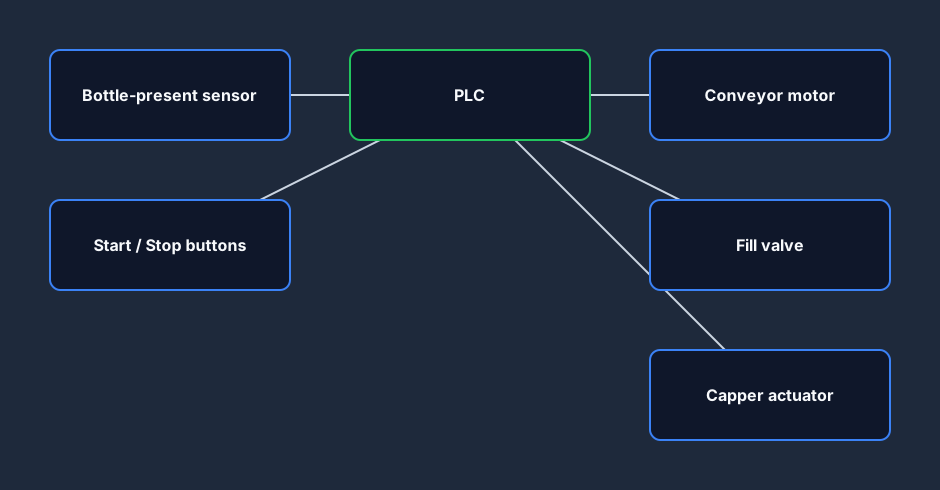
The bottle-present sensor (a photo-eye or proximity switch at the fill nozzle) is the heartbeat of the machine. It tells the PLC when a bottle has arrived and when it has cleared. Everything downstream — stopping the conveyor, opening the valve, advancing the step — keys off that one bit.
The fill sequence as a state machine
The cleanest way to think about a packing machine PLC program is a state machine. The machine is always in exactly one state, and a single condition moves it to the next one.
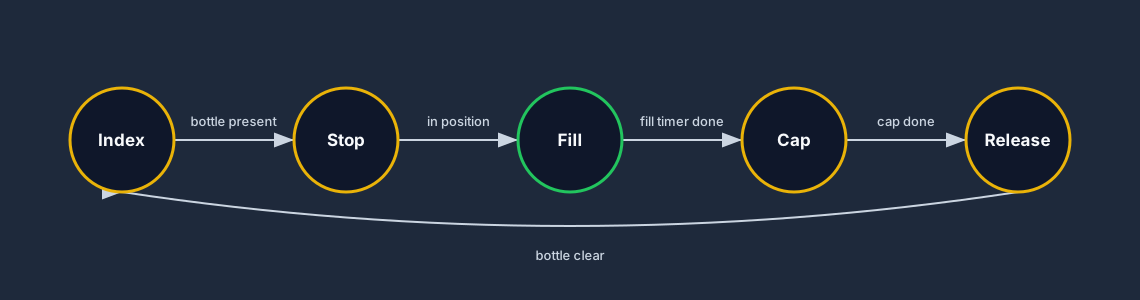
- Index — the conveyor runs, carrying the next empty bottle toward the fill station.
- Stop — the bottle-present sensor trips, the conveyor stops, and the bottle settles in position.
- Fill — the fill valve opens. A timer counts the dose.
- Cap — the valve closes and the capper actuator drives down to seat a cap.
- Release — the capped bottle is pushed clear; when the sensor clears, the machine returns to Index for the next bottle.
In ladder logic each state is a latch (a "step bit"). Only one step bit is on at a time, and each step's exit condition sets the next step bit and resets its own. That one-step-on rule is what keeps the sequence from running two actions in the same scan.
The fill-valve rung
The most-asked-about rung is the one that opens the fill valve. It should only energise when a bottle is actually present and the fill timer says there is still filling to do.
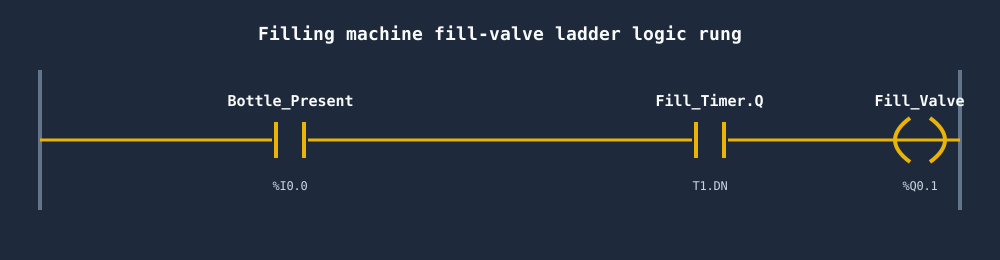
Read it left to right: Bottle_Present confirms a bottle is under the nozzle, the fill timer's done bit gates the dose, and together they drive the Fill_Valve output. In a real program the fill step bit also seals into this rung so the valve stays open through the dose even if the sensor flickers — but the principle is the same: never open the valve without a bottle-present interlock.
The timer here is a plain on-delay (TON): it starts when the fill step begins and its done bit ends the fill. If timers are new to you, the PLC timers guide walks through TON, TOF and TP with timing diagrams.
The fill cycle on a timing diagram
Watching the signals line up makes the dose obvious. The sensor goes high when the bottle arrives, the fill valve opens for the timed dose, and the timer's done bit ends it.
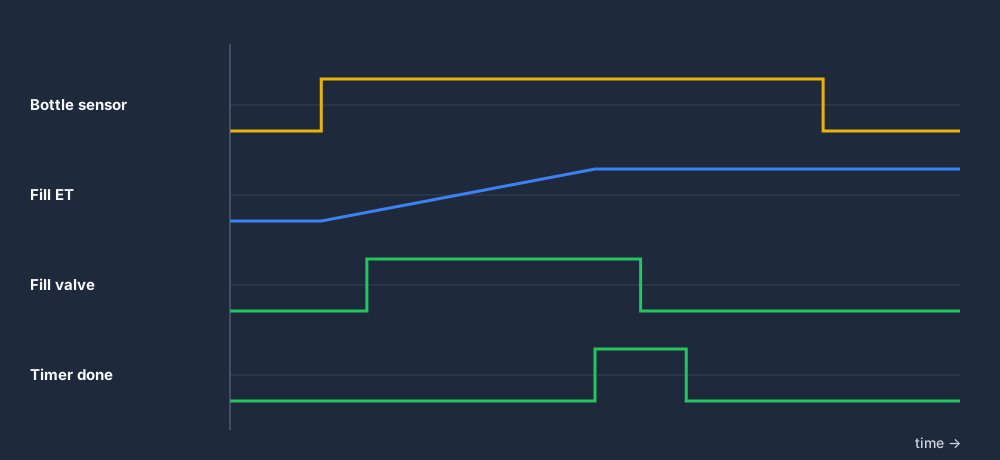
Notice the valve opens after the bottle is in position, not the instant the sensor trips — there is a short settle. And the valve closes the moment the timer's elapsed time (ET) reaches its preset. The dose volume is simply flow rate × valve-open time, which is why a timed fill is only as accurate as your flow is steady.
The full sequence with fault handling
Stitch the steps together and add the part every beginner forgets: a fault path. Real machines jam, overfill, or drop a cap, and the program has to react instead of marching on.
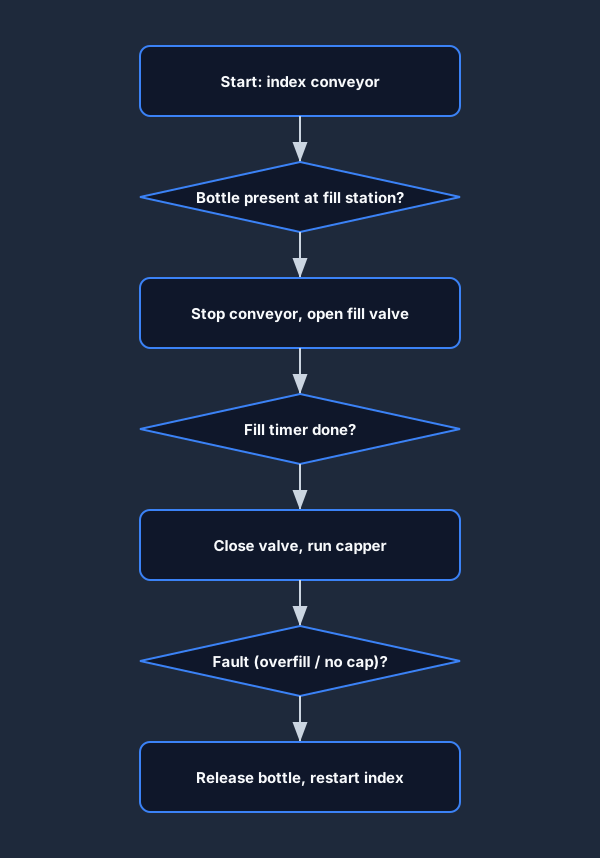
The fault check sits between capping and release. If a fault step trips — the fill ran too long, the capper did not reach its limit, or the next bottle never indexed in — the machine stops, raises an alarm, and waits for the operator instead of releasing a bad bottle. Build the fault step in from the start; bolting it on later means re-touching every other step.
Sequencing pitfalls to avoid
Most bottle-filling bugs are sequencing mistakes, not wiring faults. These are the ones that show up again and again.
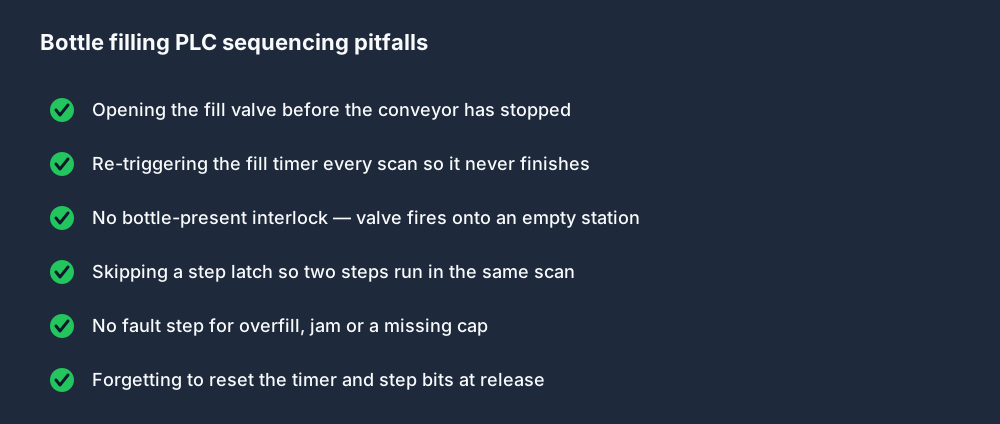
The two that cause the most lost product: opening the valve before the conveyor has fully stopped (it sprays a moving bottle), and re-triggering the fill timer every scan so it resets to zero and the valve never closes. Both come back to the scan cycle — a step latch and an edge-triggered timer enable fix them.
Timed fill vs flow-meter fill
There are two ways to control how much liquid goes in. A timed fill opens the valve for a fixed time. A flow-meter fill counts actual volume and closes the valve at a target.
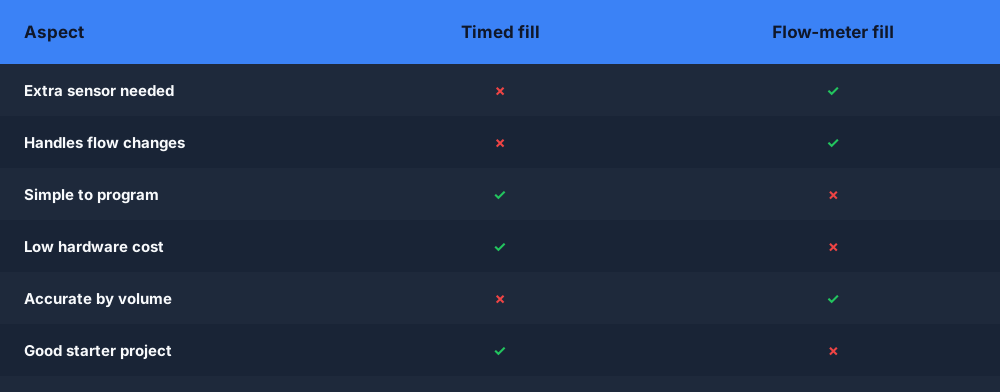
A timed fill is the right place to start: no extra sensor, simple ladder, and perfect for learning the sequence. Its weakness is that it assumes constant flow — change the supply pressure or the liquid's viscosity and the dose drifts. A flow-meter fill adds a flow sensor and a counter so the dose is measured by volume, which holds accuracy as conditions change, at the cost of more hardware and a slightly more involved program. For a first project, build the timed version; once it runs, swapping the timer's done bit for a flow-count target is a small change.
Build the bottle filling sequence in your browser
Reading the sequence is one thing; watching the step bits hand off and the fill timer count up is what makes it stick. Start practicing free to build the contact, coil and timer foundations in the browser, then open the complete bottling-line scenario when you are ready to prove fill, cap, label and fault interlocks against visible I/O and automated tests.
FAQ
What is the basic bottle filling PLC sequence? Index the conveyor until a bottle reaches the fill station, stop the conveyor, open the fill valve for a set dose, cap the bottle, then release it and index the next one. Each step waits for a sensor or timer before advancing.
How does ladder logic open the fill valve? A rung energises the fill-valve output only when the bottle-present sensor is true and the fill timer is still running. The fill step bit seals in so the valve stays open through the dose, and the timer's done bit ends the fill.
What sensors does a bottle filling machine need? At minimum a bottle-present sensor (photo-eye or proximity switch) at the fill nozzle to detect arrival and clearance. Add a capper limit switch for fault detection, and a flow meter if you need volume-accurate filling.
Is a timed fill or a flow-meter fill better? A timed fill is simpler and cheaper and is ideal for learning, but it drifts if flow changes. A flow-meter fill measures actual volume so it stays accurate, at the cost of an extra sensor and a bit more program logic.