PLC Simulator
Studio 5000 / Logix Designer

Learn the Skills Studio 5000 Users Need — Free, in Your Browser

Studio 5000 Logix Designer is the industry-standard Allen-Bradley programming environment. This is the honest on-ramp to it: practise XIC, XIO, OTE, tags, timers, and counters in a free browser simulator — no Windows VM, no Rockwell licence, on any device.

Join 9900+ learners practicing PLC programming

Create a free account to save your progress.

Studio 5000 tutorial — practise Allen-Bradley Logix Designer skills in the browser

Opening honesty

This is not Studio 5000 — it is practice for it.

If you are programming a real ControlLogix or CompactLogix controller on a plant floor, you will use Studio 5000 Logix Designer — there is no substitute for that on real hardware. This page is about the step before: building Allen-Bradley ladder fluency cheaply, on any computer, so the licensed tools feel familiar the first time you open them.

The positioning is honest: learn the skills Studio 5000 users need, free in your browser, then the real tool is a UI you pick up in a day.

What Studio 5000 is

Studio 5000 Logix Designer — the full picture

Studio 5000 Logix Designer (formerly RSLogix 5000) is Rockwell Automation's programming environment for the ControlLogix and CompactLogix controller families. It replaced the RSLogix 5000 brand at version 21 and is now the standard tool for all new Allen-Bradley Logix-platform projects.

The real costs of using it as a learner are real: it is Windows-only, requires a FactoryTalk Activation licence (which employers provide but students typically cannot access), and needs several gigabytes of installation including the FactoryTalk Services Platform. Without hardware or Studio 5000 Logix Emulate (itself a licensed add-on), you cannot feel the full control loop.

View Designer is Rockwell's companion HMI tool for PanelView screens. FactoryTalk View (ME/SE) is the broader SCADA/HMI suite. Together they form the Rockwell ecosystem that drives most mid-to-large North American industrial sites.

A Studio 5000 Logix Designer ladder rung — an XIC examine-if-closed contact driving an OTE output coil with tag-based addressing — the construct you practise free in a browser PLC simulatorA basic ladder logic rung between two power rails: an examine-if-closed contact (XIC) in series driving an output coil (OTE).L1L2] [StartXIC I:0/0LampOTE O:0/0
The atom of every Studio 5000 program: a tag-addressed XIC contact driving an OTE coil.

The differentiator

Studio 5000 term — universal concept — practice link

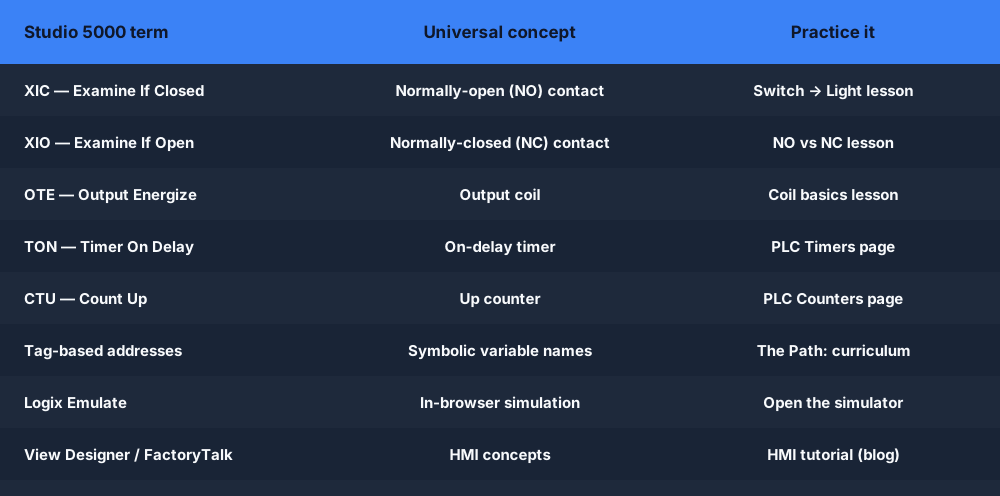
Every Studio 5000 instruction maps onto a transferable IEC 61131-3 concept. The table below shows that mapping — and links you straight to a free practice lesson for each one.

Studio 5000 termUniversal conceptPractice it here
XIC — Examine If ClosedNormally-open (NO) contactLesson: Switch → Light
XIO — Examine If OpenNormally-closed (NC) contactLesson: NO vs NC
OTE — Output EnergizeOutput coilLesson: Coil basics
TON — Timer On DelayOn-delay timerTimer lessons
CTU — Count UpUp counterCounter lessons
Tag-based addressesSymbolic variable namesThe Path: curriculum
Logix Emulate (virtual ctrl)In-browser simulationOpen the simulator
View Designer / FactoryTalkHMI conceptsHMI tutorial (blog)
Studio 5000 Logix Designer term to universal concept mapping table with practice links
Every Studio 5000 instruction has a universal equivalent you can practise today.
Studio 5000 Logix Designer ladder symbols — the XIC normally-open contact, XIO normally-closed contact and OTE output coil you read on almost every Logix rungThe core ladder logic symbols side by side: XIC examine-if-closed, XIO examine-if-open, OTE output energize, OTL output latch and OTU output unlatch.XICIfXIOIfOTEEnergizeLOTLLatchUOTUUnlatch
The three symbols on almost every Studio 5000 rung: XIC, XIO, and OTE.

Where Rockwell slows beginners

The real cost of starting with Studio 5000

Windows-only

Studio 5000 does not run on Mac, Linux, or Chromebook. Getting started requires a Windows machine or a VM with its own setup overhead.

Licensed, not free

Studio 5000 is a professional, paid product. A learner without an employer FactoryTalk licence cannot open it.

Multi-gigabyte install

The installer pulls down FactoryTalk Services Platform and multiple components before you reach a blank ladder project.

Needs a controller or Emulate

Without hardware or the separate Logix Emulate product, the design experience is incomplete — no live scan to watch.

No scored curriculum

Studio 5000 is a workbench, not a course. There is no auto-grader telling a beginner whether their rung is logically correct.

No interview / portfolio mode

Built for professional work, not self-paced interview prep or a CV-ready portfolio of solved scenarios.

The learning path

The Path — a structured route from zero to job-ready

Our curriculum is designed to build the skills that Studio 5000 users use every day, in a sequence that makes each concept feel inevitable before the next arrives.

1

Contacts and coils

XIC, XIO, OTE — the three instructions that appear on nearly every rung. Build your first switch-to-light rung and watch the scan execute.

Start this step →
2

Seal-in and interlock patterns

The motor start/stop latch and the safety interlock are the two rungs you will see on every panel diagram. Master them here.

Start this step →
3

Timers — TON, TOF, RTO

Learn how .EN, .DN, and .ACC work, and the common mistake of reading the enable bit instead of the done bit.

Start this step →
4

Counters — CTU, CTD

Count parts, count strokes, count faults. Practise CTU up-counters and CTD down-counters on real machine scenarios.

Start this step →
5

Allen-Bradley dialect and tag addresses

Switch the editor to Allen-Bradley mode. Your rungs now use XIC/XIO/OTE notation and tag-based addresses, exactly as in Studio 5000.

Start this step →
6

Fault diagnosis

Practise the 5-step troubleshooting method on 12 browser fault scenarios — wiring faults, logic faults, runtime faults, and scan-order problems.

Start this step →

Your first program

Write your first Studio 5000-style program — and actually run it

Most Studio 5000 tutorials stop at screenshots: you watch someone create a project, add a controller, and drop a contact — but you never get to run anything yourself unless you have the licensed software and a controller. Here you build the same three starter rungs and watch them execute against a real scan engine, free, in the browser. These four diagrams are the program you will build, rung by rung.

First Studio 5000 program, rung 1 — a tag-based motor seal-in: Start_PB and Stop_PB contacts with Motor_Run latching itself in, the classic three-wire control rungA seal-in latch rung: a Start contact in parallel with a Hold contact, in series with a normally-closed Stop contact, driving an output coil.StartHold (seal)StopMotor
Rung 1 — the motor seal-in, the first rung nearly every Logix Designer beginner writes.
First Studio 5000 program, rung 2 — a TON on-delay timer showing the EN enable, ACC accumulator and DN done bit that Logix Designer beginners must read correctlyA TON on-delay timer: the accumulated time bar ramps up toward the preset value, and the done (DN) bit turns on when the accumulator reaches preset.TONPRE 5000ACCACC ramps to PREPREDNdone bit
Rung 2 — a TON timer. Practise reading the .DN done bit, not the .EN enable bit.
First Studio 5000 program, rung 3 — a CTU up-counter with ACC accumulator, PRE preset and DN done bit, counting parts on a conveyor in Logix Designer styleA CTU count-up counter: each input pulse increments the accumulator toward the preset, and the done (DN) bit turns on when count reaches preset.count pulsesCTUPRE 5ACC 3ACCcount toward presetDNdone bit
Rung 3 — a CTU up-counter that trips at the preset, counting parts on a conveyor.
The scan cycle a ControlLogix or CompactLogix controller runs in Studio 5000 — read inputs, solve the ladder, write outputs — reproduced so your browser program behaves like the real thingThe repeating PLC scan cycle: read inputs, execute the ladder logic, update outputs, then housekeeping, looping continuously.1Read Inputs2Execute Logic3Update Outputs4HousekeepingSCANCYCLE
The scan cycle: read inputs, solve ladder top-to-bottom, write outputs — every scan.
Run your first Studio 5000-style program in a free browser PLC simulator — build the rungs, run them, and watch the scan with no Logix Designer install or Rockwell licenceA web browser window running a PLC ladder logic simulator with an input/output strip, requiring no installation or download.plcsimulator.app/playno installINPUTSOUTPUTS
No FactoryTalk licence and no ControlLogix? Run the same logic free in any browser.

Use Studio 5000 if…

  • You are programming a real ControlLogix or CompactLogix.
  • You need to download logic to a controller or go online.
  • You build FactoryTalk HMI screens or configure EtherNet/IP I/O.
  • You have Windows and a Rockwell licence available.
  • You want a virtual controller via Logix Emulate.

Use our simulator if…

  • You want to practise XIC, XIO, OTE, timers, and counters today.
  • You are on a Mac, Linux, or Chromebook.
  • You have no Studio 5000 licence yet.
  • You want auto-graded scenarios with instant feedback.
  • You are prepping for an Allen-Bradley ladder interview.
  • You want to start free, with zero install.

Keep exploring

Related on this site

  • RSLogix simulator — focused on the older RSLogix 500 file-based addressing used on SLC 500 and MicroLogix controllers.
  • RSLogix 5000 tutorial — the tutorial companion to the simulator lander above; learning path for the RSLogix 5000 dialect specifically.
  • Studio 5000 Emulate alternative — comparing Logix Emulate against browser-based practice.
  • Allen-Bradley PLC simulator — the broader Allen-Bradley practice surface including ControlLogix-style tag addresses.
  • PLC timers — TON, TOF, and RTO deep dives with interactive browser practice.
Questions

Studio 5000 tutorial FAQ

No. Studio 5000 Logix Designer is a Windows-only, licensed programming environment from Rockwell Automation. We are an independent, browser-based learning simulator that teaches the Allen-Bradley ladder dialect — XIC, XIO, OTE, timers, and counters — so you can practise the underlying skills without buying or installing anything. You will need the real Rockwell tools when programming an actual ControlLogix or CompactLogix controller.

Practise the skills Studio 5000 users need — free, in your browser.

No Windows VM. No Rockwell licence. No install. Start today.

Independent vendor-platform field guide

Studio 5000 tutorial: implementation, evidence and troubleshooting

Direct answer

Studio 5000 tutorial becomes useful when it connects the logix controller, studio generation, firmware, chassis, modules, task model, project backup and change boundary with module and alias tags through tasks, programs and routines to outputs, equipment feedback and diagnostics, then proves a tag-based start-stop, timer and sequence routine monitored over repeated cases under normal, boundary, fault and recovery conditions. The objective is a repeatable engineering or learning result, not merely activity inside a page or tool.

This guide is written for pLC learners moving into Logix tags, tasks, programs, routines, modules, monitoring and controlled change workflows. The intended result is specific: the learner can structure and monitor a bounded Logix-style project and identify version, firmware, controller and hardware checks required before commissioning.

System map / 02

Six concepts that control the result

Treat these as connected checkpoints. Each checkpoint has an expected state, an observable state and a boundary to the next part of the system. That structure prevents a software indication from being mistaken for physical proof.

NODE 01observable

Define the operating contract

the Logix controller, Studio generation, firmware, chassis, modules, task model, project backup and change boundary. For Studio 5000 Logix Designer workflow, record the initial condition, actor, requested change, observable result and stopping condition before selecting a tool or implementation.

NODE 02observable

Map the evidence path

module and alias tags through tasks, programs and routines to outputs, equipment feedback and diagnostics. Separate request, internal state, output or service, physical or user-visible result and independent feedback so each boundary can be inspected.

NODE 03observable

Prove normal operation

a tag-based start-stop, timer and sequence routine monitored over repeated cases. Run more than one cycle from a known state and retain the values, timings or artifacts that demonstrate repeatability.

NODE 04observable

Exercise a boundary case

prescan, first scan, periodic tasks, retentive tags, online edits, download state and restart. Choose minimum, maximum, simultaneous, delayed or restart conditions that reveal assumptions hidden by the happy path.

NODE 05observable

Diagnose a controlled fault

a tag scope, duplicate writer, routine, task, module, I/O or feedback fault. Preserve the first symptom, divide the system at a measurable boundary and change one condition only after predicting the result.

NODE 06observable

Transfer and hand over

backup, compare, official compile, controlled download and target acceptance tests. Restore normal state, remove temporary changes, repeat affected checks and document which claims remain limited to the learning environment.
Procedure / 03

A six-step practice and commissioning workflow

Run the steps in order the first time. Later, the same structure becomes a diagnostic loop: define the expected condition, observe the boundary, interpret the difference and choose one proving action.

  1. 01

    Write the acceptance case

    Convert the logix controller, studio generation, firmware, chassis, modules, task model, project backup and change boundary into initial conditions, one stimulus and observable pass criteria.

    Evidence: Another person can repeat the case without guessing the intended result.

    Avoid: Using page completion or an animation as the acceptance criterion.

  2. 02

    Build the map

    Document module and alias tags through tasks, programs and routines to outputs, equipment feedback and diagnostics and name who owns each state or decision.

    Evidence: Every request and result has a source, destination and useful inspection point.

    Avoid: Using the same value as command, status and independent feedback.

  3. 03

    Run the baseline

    Apply a tag-based start-stop, timer and sequence routine monitored over repeated cases from a clean start and record the expected evidence.

    Evidence: Repeated runs produce the same bounded result.

    Avoid: Changing several parameters before a baseline exists.

  4. 04

    Challenge assumptions

    Test prescan, first scan, periodic tasks, retentive tags, online edits, download state and restart without changing the acceptance contract.

    Evidence: Limits, timing and restart behavior reach defined states.

    Avoid: Testing only one ideal sequence.

  5. 05

    Isolate one failure

    Introduce or analyse a tag scope, duplicate writer, routine, task, module, i/o or feedback fault and locate the first disagreement.

    Evidence: The proving action distinguishes the leading hypotheses.

    Avoid: Resetting, forcing or replacing before evidence is retained.

  6. 06

    Close the evidence loop

    Complete backup, compare, official compile, controlled download and target acceptance tests and repeat the affected regression cases.

    Evidence: Transfer is complete only after the example is recreated, compiled and tested in the official engineering environment and on the intended controller family.

    Avoid: Treating an acknowledged message or one successful rerun as handover.

Diagnostic matrix / 04

Symptoms, proving points and next actions

The table is a reasoning aid, not a parts-replacement chart. Preserve the initial symptom, inspect the named boundary and use the interpretation to choose the next controlled test. Site safety procedures and equipment manuals remain authoritative.

Diagnostic symptoms, inspection points, interpretations and next actions for Studio 5000 tutorial: implementation, evidence and troubleshooting
Observed symptomInspectInterpretationNext proving action
The expected result is unclearRequirement, initial state, actor, stimulus, units and pass conditionThe learner, maintainer and target-platform reviewer may be solving different versions of the task.Rewrite one observable acceptance case before continuing.
Internal state changes but the outcome does notRequest, final owner, output or service boundary and independent feedbackA software or interface indication proves intent at one layer, not the complete outcome.Trace the first boundary after the changing state.
Normal case passes but an edge case failsLimits, timing, simultaneous events, reset and restart assumptionsThe implementation contains a hidden assumption exposed by the changed condition.Add the failed boundary as a permanent regression case.
The failure disappears after resetOriginal symptom, histories, diagnostics, timestamps and active causeReset changed evidence or state without proving the initiating cause.Reproduce under a controlled condition and preserve pre/post-event data.
Simulator and target disagreeModel boundary, software version, task timing, I/O behavior, data types and configurationA learning model and the intended target do not share one of the recorded assumptions.Reduce the case and verify against current target documentation.
The result cannot be explainedPrediction, observation, proving action, alternative hypotheses and limitationsActivity occurred but the evidence is not yet transferable or reviewable.Have the learner defend the signal path and repeat a changed case.

Product evidence / 05

What the browser practice can actually demonstrate

The browser material teaches transferable control behavior and vendor-oriented terminology while keeping project files, firmware and exact runtime behavior outside the claim.

Where simulation stops

This independent tutorial does not distribute Studio 5000, open native projects in the browser or guarantee behavior across controller, firmware and software versions.

Commissioning notebook / 06

Six cases that turn the concepts into evidence

Use these as written briefs rather than click-through instructions. For every case, state the expected condition before acting, retain the first useful observation and explain why the final result proves the requirement. A different program or component choice can still be correct when it produces the same bounded behavior and evidence.

Case 01

predict → observe → prove

Prove define the operating contract

Engineering context. the Logix controller, Studio generation, firmware, chassis, modules, task model, project backup and change boundary. For Studio 5000 Logix Designer workflow, record the initial condition, actor, requested change, observable result and stopping condition before selecting a tool or implementation. Begin with a written normal condition and identify which request, state, physical result or communication value will provide independent confirmation. Do not begin by changing the configuration; the initial state is part of the evidence and should remain reproducible.

Controlled setup. Use the “Write the acceptance case” stage of the workflow: convert the logix controller, studio generation, firmware, chassis, modules, task model, project backup and change boundary into initial conditions, one stimulus and observable pass criteria. The acceptance record should show this result: another person can repeat the case without guessing the intended result. Record initial conditions, the exact stimulus and the observation point so another learner can repeat the case without relying on your memory.

Fault challenge. Introduce or analyse “The expected result is unclear” as one bounded deviation. Inspect requirement, initial state, actor, stimulus, units and pass condition The working interpretation is that the learner, maintainer and target-platform reviewer may be solving different versions of the task. The next proving action is to rewrite one observable acceptance case before continuing. Change only one condition before observing the result, and preserve timestamps or measurements where timing matters.

Review and recovery. The most common trap here is using page completion or an animation as the acceptance criterion. After restoring the cause, repeat the normal case and at least one stop, timeout, disconnect or restart boundary relevant to this topic. Remove temporary forces and bypasses, return the model to a known state and retain the evidence that both operation and recovery are deliberate.

Explain it aloud: What should I learn first about Studio 5000 Logix Designer workflow? A defensible short answer is: Start with the operating contract and evidence path: the logix controller, studio generation, firmware, chassis, modules, task model, project backup and change boundary, followed by module and alias tags through tasks, programs and routines to outputs, equipment feedback and diagnostics. Add advanced features only after the baseline is predictable.

Case 02

predict → observe → prove

Prove map the evidence path

Engineering context. module and alias tags through tasks, programs and routines to outputs, equipment feedback and diagnostics. Separate request, internal state, output or service, physical or user-visible result and independent feedback so each boundary can be inspected. Begin with a written normal condition and identify which request, state, physical result or communication value will provide independent confirmation. Do not begin by changing the configuration; the initial state is part of the evidence and should remain reproducible.

Controlled setup. Use the “Build the map” stage of the workflow: document module and alias tags through tasks, programs and routines to outputs, equipment feedback and diagnostics and name who owns each state or decision. The acceptance record should show this result: every request and result has a source, destination and useful inspection point. Record initial conditions, the exact stimulus and the observation point so another learner can repeat the case without relying on your memory.

Fault challenge. Introduce or analyse “Internal state changes but the outcome does not” as one bounded deviation. Inspect request, final owner, output or service boundary and independent feedback The working interpretation is that a software or interface indication proves intent at one layer, not the complete outcome. The next proving action is to trace the first boundary after the changing state. Change only one condition before observing the result, and preserve timestamps or measurements where timing matters.

Review and recovery. The most common trap here is using the same value as command, status and independent feedback. After restoring the cause, repeat the normal case and at least one stop, timeout, disconnect or restart boundary relevant to this topic. Remove temporary forces and bypasses, return the model to a known state and retain the evidence that both operation and recovery are deliberate.

Explain it aloud: How do I practise Studio 5000 Logix Designer workflow effectively? A defensible short answer is: Use short cases with known initial conditions, a written prediction, one action and an observable result. Then alter a boundary or fault and explain why the evidence changed.

Case 03

predict → observe → prove

Prove prove normal operation

Engineering context. a tag-based start-stop, timer and sequence routine monitored over repeated cases. Run more than one cycle from a known state and retain the values, timings or artifacts that demonstrate repeatability. Begin with a written normal condition and identify which request, state, physical result or communication value will provide independent confirmation. Do not begin by changing the configuration; the initial state is part of the evidence and should remain reproducible.

Controlled setup. Use the “Run the baseline” stage of the workflow: apply a tag-based start-stop, timer and sequence routine monitored over repeated cases from a clean start and record the expected evidence. The acceptance record should show this result: repeated runs produce the same bounded result. Record initial conditions, the exact stimulus and the observation point so another learner can repeat the case without relying on your memory.

Fault challenge. Introduce or analyse “Normal case passes but an edge case fails” as one bounded deviation. Inspect limits, timing, simultaneous events, reset and restart assumptions The working interpretation is that the implementation contains a hidden assumption exposed by the changed condition. The next proving action is to add the failed boundary as a permanent regression case. Change only one condition before observing the result, and preserve timestamps or measurements where timing matters.

Review and recovery. The most common trap here is changing several parameters before a baseline exists. After restoring the cause, repeat the normal case and at least one stop, timeout, disconnect or restart boundary relevant to this topic. Remove temporary forces and bypasses, return the model to a known state and retain the evidence that both operation and recovery are deliberate.

Explain it aloud: What counts as proof of competence? A defensible short answer is: A repeatable artifact or system result plus an explanation of the signal path is stronger than time spent, screenshots or a copied answer. Physical competence requires separate supervised evidence.

Case 04

predict → observe → prove

Prove exercise a boundary case

Engineering context. prescan, first scan, periodic tasks, retentive tags, online edits, download state and restart. Choose minimum, maximum, simultaneous, delayed or restart conditions that reveal assumptions hidden by the happy path. Begin with a written normal condition and identify which request, state, physical result or communication value will provide independent confirmation. Do not begin by changing the configuration; the initial state is part of the evidence and should remain reproducible.

Controlled setup. Use the “Challenge assumptions” stage of the workflow: test prescan, first scan, periodic tasks, retentive tags, online edits, download state and restart without changing the acceptance contract. The acceptance record should show this result: limits, timing and restart behavior reach defined states. Record initial conditions, the exact stimulus and the observation point so another learner can repeat the case without relying on your memory.

Fault challenge. Introduce or analyse “The failure disappears after reset” as one bounded deviation. Inspect original symptom, histories, diagnostics, timestamps and active cause The working interpretation is that reset changed evidence or state without proving the initiating cause. The next proving action is to reproduce under a controlled condition and preserve pre/post-event data. Change only one condition before observing the result, and preserve timestamps or measurements where timing matters.

Review and recovery. The most common trap here is testing only one ideal sequence. After restoring the cause, repeat the normal case and at least one stop, timeout, disconnect or restart boundary relevant to this topic. Remove temporary forces and bypasses, return the model to a known state and retain the evidence that both operation and recovery are deliberate.

Explain it aloud: Why test faults and restart behavior? A defensible short answer is: Because a tag scope, duplicate writer, routine, task, module, i/o or feedback fault or prescan, first scan, periodic tasks, retentive tags, online edits, download state and restart can expose assumptions that never appear during ideal startup and steady operation.

Case 05

predict → observe → prove

Prove diagnose a controlled fault

Engineering context. a tag scope, duplicate writer, routine, task, module, I/O or feedback fault. Preserve the first symptom, divide the system at a measurable boundary and change one condition only after predicting the result. Begin with a written normal condition and identify which request, state, physical result or communication value will provide independent confirmation. Do not begin by changing the configuration; the initial state is part of the evidence and should remain reproducible.

Controlled setup. Use the “Isolate one failure” stage of the workflow: introduce or analyse a tag scope, duplicate writer, routine, task, module, i/o or feedback fault and locate the first disagreement. The acceptance record should show this result: the proving action distinguishes the leading hypotheses. Record initial conditions, the exact stimulus and the observation point so another learner can repeat the case without relying on your memory.

Fault challenge. Introduce or analyse “Simulator and target disagree” as one bounded deviation. Inspect model boundary, software version, task timing, I/O behavior, data types and configuration The working interpretation is that a learning model and the intended target do not share one of the recorded assumptions. The next proving action is to reduce the case and verify against current target documentation. Change only one condition before observing the result, and preserve timestamps or measurements where timing matters.

Review and recovery. The most common trap here is resetting, forcing or replacing before evidence is retained. After restoring the cause, repeat the normal case and at least one stop, timeout, disconnect or restart boundary relevant to this topic. Remove temporary forces and bypasses, return the model to a known state and retain the evidence that both operation and recovery are deliberate.

Explain it aloud: Can browser practice replace official software or hardware? A defensible short answer is: No. It can build concepts and diagnostic reasoning. Exact firmware, I/O electrical behavior, networking, safety and commissioning require current official tools, documentation and target equipment.

Case 06

predict → observe → prove

Prove transfer and hand over

Engineering context. backup, compare, official compile, controlled download and target acceptance tests. Restore normal state, remove temporary changes, repeat affected checks and document which claims remain limited to the learning environment. Begin with a written normal condition and identify which request, state, physical result or communication value will provide independent confirmation. Do not begin by changing the configuration; the initial state is part of the evidence and should remain reproducible.
Controlled setup. Use the “Close the evidence loop” stage of the workflow: complete backup, compare, official compile, controlled download and target acceptance tests and repeat the affected regression cases. The acceptance record should show this result: transfer is complete only after the example is recreated, compiled and tested in the official engineering environment and on the intended controller family. Record initial conditions, the exact stimulus and the observation point so another learner can repeat the case without relying on your memory.

Fault challenge. Introduce or analyse “The result cannot be explained” as one bounded deviation. Inspect prediction, observation, proving action, alternative hypotheses and limitations The working interpretation is that activity occurred but the evidence is not yet transferable or reviewable. The next proving action is to have the learner defend the signal path and repeat a changed case. Change only one condition before observing the result, and preserve timestamps or measurements where timing matters.

Review and recovery. The most common trap here is treating an acknowledged message or one successful rerun as handover. After restoring the cause, repeat the normal case and at least one stop, timeout, disconnect or restart boundary relevant to this topic. Remove temporary forces and bypasses, return the model to a known state and retain the evidence that both operation and recovery are deliberate.

Explain it aloud: How should progress be documented? A defensible short answer is: Keep the requirement, initial state, program or configuration, observed values, fault hypothesis, proving action, recovery result and a concise limitations statement.

Answer surface / 07

Questions people ask about Studio 5000 tutorial

These concise answers define the operating, training and product boundaries most often missed in broad summaries. The full workflow and diagnostic table above provide the evidence behind them.

What should I learn first about Studio 5000 Logix Designer workflow?

Start with the operating contract and evidence path: the logix controller, studio generation, firmware, chassis, modules, task model, project backup and change boundary, followed by module and alias tags through tasks, programs and routines to outputs, equipment feedback and diagnostics. Add advanced features only after the baseline is predictable.

How do I practise Studio 5000 Logix Designer workflow effectively?

Use short cases with known initial conditions, a written prediction, one action and an observable result. Then alter a boundary or fault and explain why the evidence changed.

What counts as proof of competence?

A repeatable artifact or system result plus an explanation of the signal path is stronger than time spent, screenshots or a copied answer. Physical competence requires separate supervised evidence.

Why test faults and restart behavior?

Because a tag scope, duplicate writer, routine, task, module, i/o or feedback fault or prescan, first scan, periodic tasks, retentive tags, online edits, download state and restart can expose assumptions that never appear during ideal startup and steady operation.

Can browser practice replace official software or hardware?

No. It can build concepts and diagnostic reasoning. Exact firmware, I/O electrical behavior, networking, safety and commissioning require current official tools, documentation and target equipment.

How should progress be documented?

Keep the requirement, initial state, program or configuration, observed values, fault hypothesis, proving action, recovery result and a concise limitations statement.

What should I do when the answer differs from a guide?

Check assumptions, version, units and initial state first. Reduce the case, compare one boundary at a time and prefer current primary documentation for target-specific behavior.

When is a Studio 5000 Logix Designer workflow exercise finished?

Transfer is complete only after the example is recreated, compiled and tested in the official engineering environment and on the intended controller family.