PLC Simulator
PLC field noteselectrical

Relay vs Contactor: What's the Difference and When Do You Use Each?

Relays and contactors both use a coil to switch contacts. The difference is scale, rating, and application. This guide explains construction, current ratings, motor starters, and when each belongs in a control panel.

PLC Simulation Software8 min read

Relay vs contactor — construction, ratings, motor starters and when to use each

A relay and a contactor do the same fundamental thing: a coil generates a magnetic field, that field moves a mechanical armature, and the armature opens or closes a set of contacts. Both are electromagnetic switching devices. The question "what is the difference between a relay and a contactor?" is really a question about scale.

Relays are small, rated for signal-level currents in control circuits. Contactors are large, rated for motor currents in power circuits. Knowing which one to reach for — and why — is a basic competency for any PLC technician or controls electrician.

How a Relay Works

A relay has a coil and a set of contacts. Apply the rated voltage to the coil — typically 24V DC in modern panels — and it energises the electromagnet, which pulls the armature down and changes the contact state. Remove the voltage and a return spring pushes the armature back.

The contacts are rated for the maximum current and voltage they can safely switch. A typical DIN-rail relay used in control panels has contacts rated at 5A at 250V AC or 5A at 30V DC. That is plenty for:

  • Switching the coil of another relay or contactor (coils draw 0.05A to 0.2A).
  • Driving a 24V indicator lamp or buzzer.
  • Connecting a PLC output card to a higher-current device (PLC outputs typically source or sink a maximum of 0.5A; the relay allows switching larger loads from that low-current output).

Most DIN-rail relays in industrial panels are plug-in designs: the base mounts permanently on the DIN rail with the wiring connected to it, and the relay module clicks into the base. When a coil burns out after years of cycling, you press the tab, pull the old relay, snap in the new one. No rewiring required. This is deliberate design — relay bases get wired once, relays get replaced as consumables.

Modern plug-in relays often have a LED indicator built in. When the coil is energised, the LED lights. This is your first fault-finding tool: glance at the relay in the cabinet and you can immediately see which coils are energised without touching anything.

How a Contactor Works

A contactor uses exactly the same coil-and-armature mechanism as a relay. The difference is everything else.

Contactor main contacts are designed to carry motor-level current — 9A, 22A, 40A, 63A, 115A and beyond — repeatedly over hundreds of thousands of operating cycles. The contacts are large, with silver-alloy tips designed to handle the arcing that occurs when you interrupt current under load. The main contacts in a contactor are three-phase: they switch all three phases of the motor supply simultaneously.

Contactors also have auxiliary contacts — smaller contacts in the control circuit. These are typically one or two normally-open and one normally-closed contact pair. The normally-open auxiliary contact is used for the seal-in function: wired in parallel with the Start pushbutton so the contactor holds itself energised after the button is released. The normally-closed auxiliary is often used in interlock circuits — for example, ensuring the forward and reverse contactors cannot both energise at the same time.

The coil voltage on a contactor is a separate specification from the main contact rating. A common contactor might have 40A main contacts but a 24V DC coil. The PLC output or relay drives the 24V coil; the coil pulls in the contactor; the main contacts switch 415V AC at 40A to the motor. This is exactly the separation between the control circuit and the power circuit in physical hardware form.
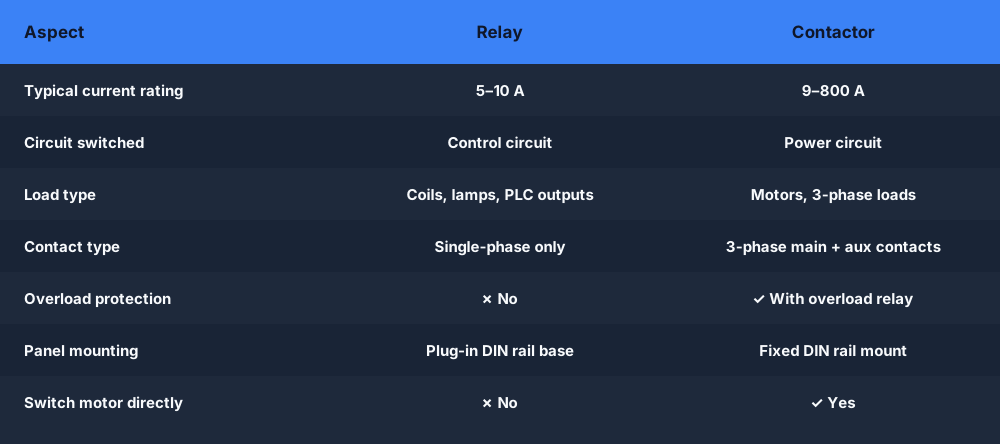
Relay vs contactor construction comparison — coil, contacts, ratings, application

The Ratings That Tell You Which to Use

The simplest decision rule: look at the current the load draws.

Reference tableSwipe
CurrentDeviceTypical application
0–10ARelayCoils, lamps, PLC I/O interfacing, small solenoids
9–800AContactorMotors, large heaters, capacitor banks

If you are switching a signal, a coil, or a light load — reach for a relay. If you are switching a motor or any three-phase load — reach for a contactor.

There is an overlap zone: some large relays (solid-state relays, for instance) can switch motors up to 25A. But in a traditional panel, 9A is roughly where you cross from relay territory into contactor territory. The Siemens 3RT and Rockwell 100-C contactor series start at 9A; most relay datasheet maximums are 10A. This is not a coincidence.

Motor Starter = Contactor + Overload Relay

A motor starter is a contactor combined with a thermal overload relay. The overload relay protects the motor against sustained overcurrent — a jammed conveyor, a pump running on a closed discharge valve, a motor with a failing bearing. For the full breakdown of what the overload relay adds and when a bare contactor is sufficient, see the motor starter vs contactor comparison. It does this by measuring the heat accumulated in a set of bimetal strips carrying the motor current. When the strips overheat (because the motor is drawing too much current for too long), they deflect, trip the overload, and open a contact in the control circuit. The control circuit opens, the contactor de-energises, the motor stops.

The overload relay has two key settings:

  • Full load current (FLC) setting: dial it to the motor's nameplate FLC. This calibrates the thermal model to the specific motor.
  • Trip class: typically Class 10 (trips within 10 seconds at 7.2× FLC), used for most standard motors.

Reset: after a thermal trip, the overload relay must be reset manually (a button on the face of the relay) after the motor has cooled. This prevents automatic restart of a faulting motor, which could be dangerous if someone is investigating the fault. Some overload relays can be configured for auto-reset in specific applications where that is safe.

The overload relay also has a normally-closed contact wired into the control circuit. When it trips, this contact opens, dropping out the contactor. The PLC sees the motor de-energise (the auxiliary contact feedback goes low), triggers a fault alarm, and prevents the operator from restarting until they reset the overload and acknowledge the alarm. This is the standard motor protection sequence.
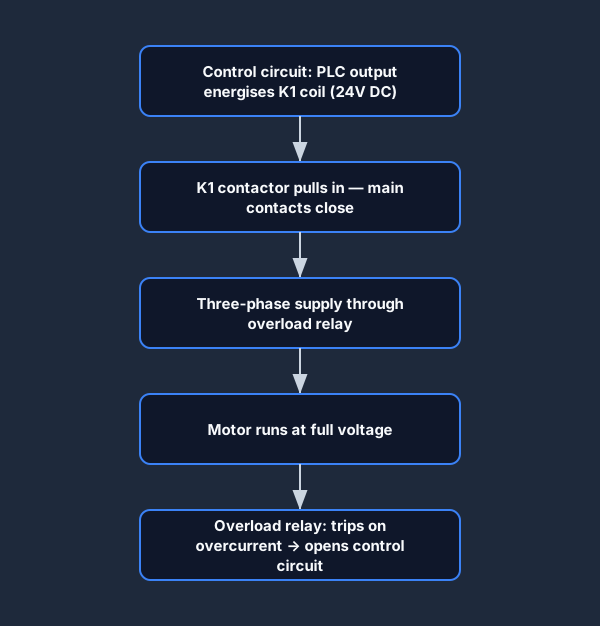
Motor starter diagram — contactor, overload relay, control circuit and fault logic

When Each Belongs in a Panel

Use a relay when:

  • A PLC output card needs to switch a load above its current rating (most PLC transistor outputs source 0.5A max — insufficient to drive a 40A contactor coil directly; an intermediate relay is used).
  • You need to galvanically isolate two circuits at different voltages (24V DC control circuit switching a 240V AC solenoid valve coil, with the relay as the isolation barrier).
  • You need to multiply one signal into several switched outputs (one PLC output drives one relay coil; that relay's multiple contacts switch several downstream devices simultaneously).
  • You are hardwiring a safety interlock that must be proven and certified (safety relays with force-guided contacts are a specific category of this).

Use a contactor when:

  • You are switching a three-phase motor.
  • You are switching any single-phase load above roughly 10A.
  • You need the sealed auxiliary contact for the motor seal-in and status feedback to the PLC.
  • The application requires the load to be switched many thousands of times per year (motors in cycling applications). Contactors are built for duty; relays are not.

Use a motor starter (contactor + overload) when:

  • You are controlling a motor directly-on-line (DOL). In most countries, thermal or electronic overload protection is a code requirement for motor circuits above a certain size.

Ladder Logic and the Contactor Seal-In

The relationship between the contactor's auxiliary contact seal-in and the PLC seal-in rung is worth understanding explicitly, because beginners often confuse the two.

In a hardwired control circuit (no PLC), the motor seal-in is done entirely in hardware. The contactor auxiliary contact is wired in parallel with the Start button. When the operator presses Start, the coil energises and the auxiliary contact closes, holding the coil energised after the button is released. Stop button or overload trip opens the circuit and drops the coil.

In a PLC-controlled circuit, the seal-in is implemented in the ladder program:

|--[Start_PB]--+--[/Stop_PB]--[/Overload]--( K1_Coil )--|
|              |
|--[K1_Aux]---+

The K1_Aux contact in the PLC's input card gives feedback from the contactor's physical auxiliary contact. When the contactor pulls in, this input goes HIGH, and the PLC seal-in rung holds the K1_Coil output energised. The physical hardwired seal-in is no longer needed — the PLC logic replaces it.

Understanding both versions is important because you will encounter both in the field. Older machines are hardwired; newer ones are PLC-controlled. Some machines use both (a hardwired safety interlock plus a PLC control circuit).

Practice Relay and Contactor Logic

The relay and contactor concepts above — seal-in rungs, interlock logic, overload trips — are exactly what the Electrical Foundations lessons on this platform cover. The first two lessons, including the relay vs contactor lesson, are free.

Start the Electrical Foundations lessons free →

If you want to build on the PLC control side, practice motor start/stop seal-in rungs and overload interlock logic in the free simulator — the same logic your PLC runs when it controls a physical motor starter.

Practice motor control ladder logic free →

Frequently Asked Questions

What is the main difference between a relay and a contactor?

Both use a coil and electromagnetic armature to switch contacts. The difference is scale and rating. Relays are small, rated for 5–10A in control circuits — used for signal switching, PLC output isolation, and coil driving. Contactors are large, rated for motor currents (9A to 800A), designed to switch three-phase motors and large loads repeatedly over many thousands of cycles.

Can a relay be used instead of a contactor?

For small loads under 10A, a relay can switch directly. For motors and three-phase loads, no — a relay is not built for the current, arcing, or cycling duty. Using a relay to switch a 415V AC motor circuit will destroy the relay contacts rapidly and is unsafe. Use a contactor rated for the motor's full load current.

What is a motor starter?

A motor starter is a contactor combined with a thermal or electronic overload relay. The contactor switches the motor's three-phase power supply. The overload relay protects the motor against sustained overcurrent by tripping the control circuit if the motor draws more than its rated full load current for longer than the protection setting allows.

What does the auxiliary contact on a contactor do?

Auxiliary contacts are smaller contacts that change state when the main contactor pulls in. The normally-open auxiliary contact is typically wired in parallel with the Start button to create the motor seal-in — it holds the contactor coil energised after the button is released. It is also wired to a PLC input to give the program feedback that the contactor has physically closed.

What is an overload relay and why is it needed?

An overload relay measures motor current using bimetal or electronic sensing. If the motor draws above its full load current for longer than the thermal protection allows — due to mechanical overload, low supply voltage, or a developing fault — the relay trips, opens the control circuit, and stops the motor before it burns out. It is required by electrical codes for motor circuits above a certain size in most countries.


Get hands-on with relay and contactor logic in the Electrical Foundations track. The relay vs contactor lesson and the control circuit lesson are free. No credit card. Start building the electrical fundamentals your PLC programming already assumes you know.
Start the Electrical Foundations track →

ShareX / TwitterLinkedIn

From reading to running logic

Practice this yourself in the simulator

Start with guided PLC practice in your browser. No install and no credit card required.

Start practising free

Continue learning

Related field notes

All articles
hmi
plc

PLC vs HMI: What's the Difference and How They Work Together

PLC vs HMI explained clearly: what each does, who runs the logic, how they communicate, common beginner confusions, and a side-by-side comparison table.

8 min read
pid
drawings

How to Read a P&ID: The PLC Technician's Guide to Process Drawings

Learn how to read a P&ID (piping and instrumentation diagram) from scratch. Covers ISA-5.1 symbols, the tag-letter decoder, two worked examples, and how to build an I/O list from a drawing.

14 min read
hmi
scada

HMI Programming Tutorial: Screens, Tags, Alarms, and Navigation

A vendor-neutral HMI programming tutorial covering screens, tag binding, pushbuttons, lamps, numeric entry, alarm design, and ISA-101 colour discipline. Practical and concept-first.

13 min read

Software evaluation field guide

Relay versus contactor comparison: implementation, evidence and troubleshooting

Direct answer

Relay versus contactor comparison becomes useful when it connects load type, voltage, current, utilization duty, poles, isolation, coil rating, plc output capacity, interface need, auxiliary contacts, overload protection, endurance and environment with plc or control command through interface and coil to mechanical contacts, load current, equipment response and independent feedback, then proves the selected device repeatedly switches the representative load within documented ratings and produces trustworthy auxiliary feedback under normal, boundary, fault and recovery conditions. The objective is a repeatable engineering or learning result, not merely activity inside a page or tool.

This guide is written for automation and electrical learners deciding which switching device belongs between a control output and a field load. The intended result is specific: the reader can compare coil circuit, contact duty, poles, auxiliary feedback, arc control, overload coordination, endurance and application consequences without choosing from appearance alone.

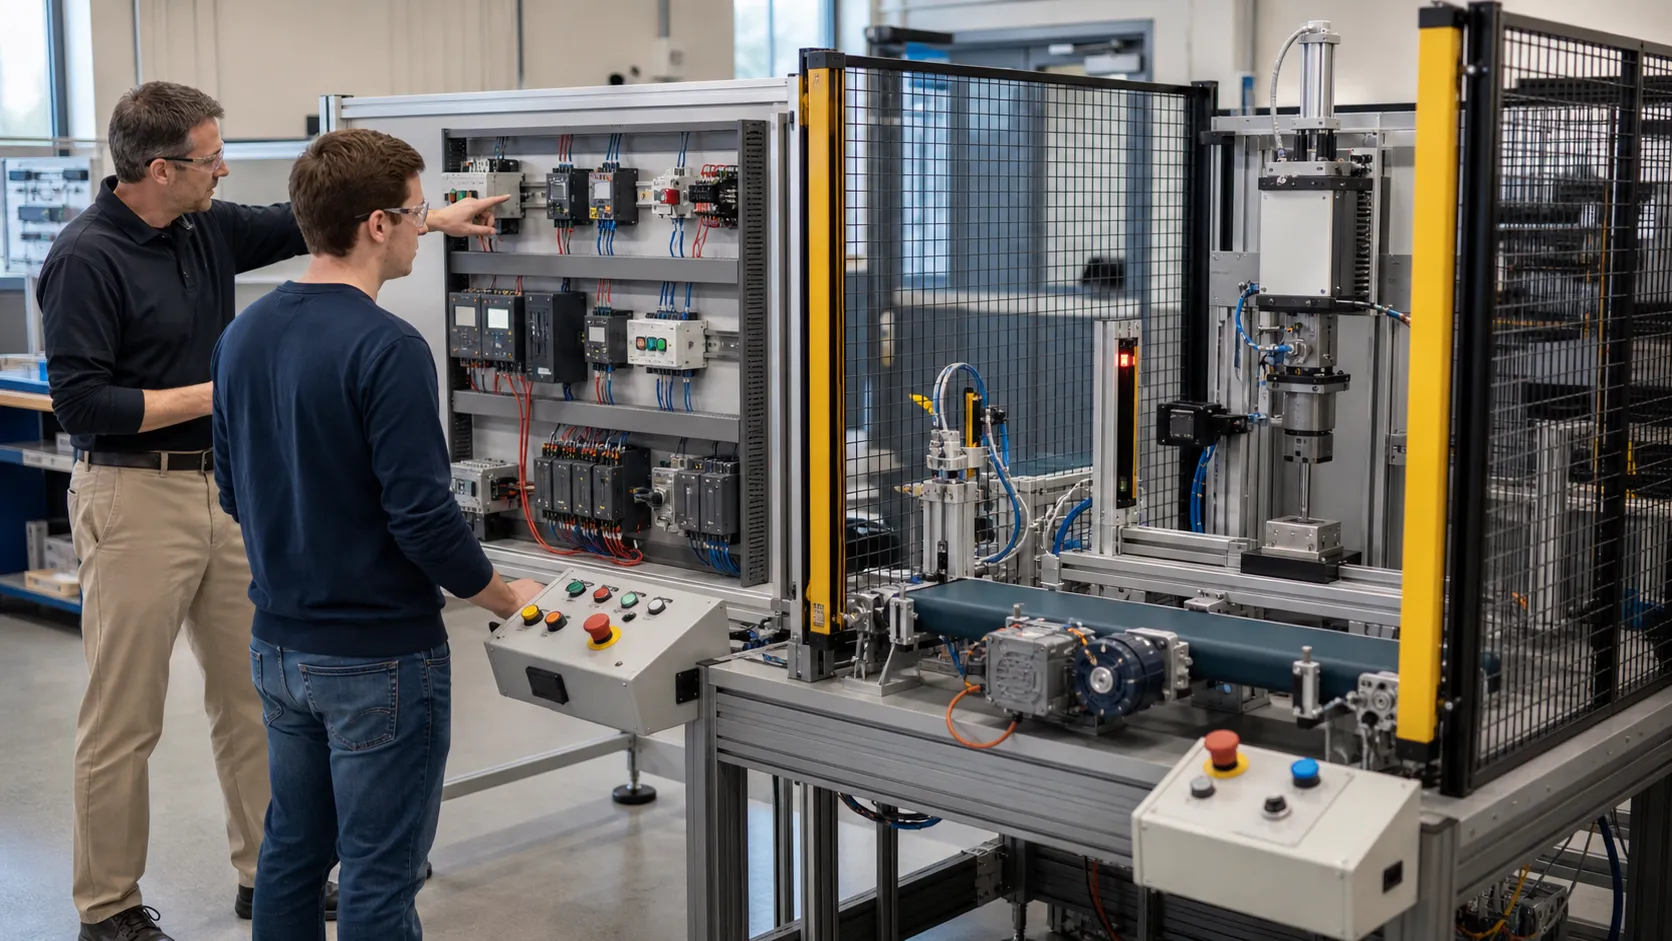
a guarded motor-control and machine-safety training cell used to prove starter, drive, interlock, stop, feedback and restart behavior while studying relay and contactor selection, interfaces, ratings and diagnostic evidence
The field scene connects relay and contactor selection, interfaces, ratings and diagnostic evidence to declared initial conditions, observable boundaries, safe limits and repeatable acceptance evidence.

System map / 02

Six concepts that control the result

Treat these as connected checkpoints. Each checkpoint has an expected state, an observable state and a boundary to the next part of the system. That structure prevents a software indication from being mistaken for physical proof.

NODE 01observable

Define the operating contract

load type, voltage, current, utilization duty, poles, isolation, coil rating, PLC output capacity, interface need, auxiliary contacts, overload protection, endurance and environment. For relay and contactor selection, interfaces, ratings and diagnostic evidence, record the initial condition, actor, requested change, observable result and stopping condition before selecting a tool or implementation.

NODE 02observable

Map the evidence path

PLC or control command through interface and coil to mechanical contacts, load current, equipment response and independent feedback. Separate request, internal state, output or service, physical or user-visible result and independent feedback so each boundary can be inspected.

NODE 03observable

Prove normal operation

the selected device repeatedly switches the representative load within documented ratings and produces trustworthy auxiliary feedback. Run more than one cycle from a known state and retain the values, timings or artifacts that demonstrate repeatability.

NODE 04observable

Exercise a boundary case

inrush, inductive release, rapid cycling, welded contact, open coil, wrong coil voltage, overloaded output, lost phase and enclosure temperature. Choose minimum, maximum, simultaneous, delayed or restart conditions that reveal assumptions hidden by the happy path.

NODE 05observable

Diagnose a controlled fault

a requirement, rating, duty, coil, interface, contact, protection, feedback or environment mismatch. Preserve the first symptom, divide the system at a measurable boundary and change one condition only after predicting the result.

NODE 06observable

Transfer and hand over

the exact device and protection selected and validated from current data and target tests. Restore normal state, remove temporary changes, repeat affected checks and document which claims remain limited to the learning environment.

Procedure / 03

A six-step practice and commissioning workflow

Run the steps in order the first time. Later, the same structure becomes a diagnostic loop: define the expected condition, observe the boundary, interpret the difference and choose one proving action.

  1. 01

    Write the acceptance case

    Convert load type, voltage, current, utilization duty, poles, isolation, coil rating, plc output capacity, interface need, auxiliary contacts, overload protection, endurance and environment into initial conditions, one stimulus and observable pass criteria.

    Evidence: Another person can repeat the case without guessing the intended result.

    Avoid: Using page completion or an animation as the acceptance criterion.

  2. 02

    Build the map

    Document plc or control command through interface and coil to mechanical contacts, load current, equipment response and independent feedback and name who owns each state or decision.

    Evidence: Every request and result has a source, destination and useful inspection point.

    Avoid: Using the same value as command, status and independent feedback.

  3. 03

    Run the baseline

    Apply the selected device repeatedly switches the representative load within documented ratings and produces trustworthy auxiliary feedback from a clean start and record the expected evidence.

    Evidence: Repeated runs produce the same bounded result.

    Avoid: Changing several parameters before a baseline exists.

  4. 04

    Challenge assumptions

    Test inrush, inductive release, rapid cycling, welded contact, open coil, wrong coil voltage, overloaded output, lost phase and enclosure temperature without changing the acceptance contract.

    Evidence: Limits, timing and restart behavior reach defined states.

    Avoid: Testing only one ideal sequence.

  5. 05

    Isolate one failure

    Introduce or analyse a requirement, rating, duty, coil, interface, contact, protection, feedback or environment mismatch and locate the first disagreement.

    Evidence: The proving action distinguishes the leading hypotheses.

    Avoid: Resetting, forcing or replacing before evidence is retained.

  6. 06

    Close the evidence loop

    Complete the exact device and protection selected and validated from current data and target tests and repeat the affected regression cases.

    Evidence: An evaluation is complete when the same representative job is tested in each candidate and differences are recorded as evidence rather than inferred from feature labels.

    Avoid: Treating an acknowledged message or one successful rerun as handover.

Diagnostic matrix / 04

Symptoms, proving points and next actions

The table is a reasoning aid, not a parts-replacement chart. Preserve the initial symptom, inspect the named boundary and use the interpretation to choose the next controlled test. Site safety procedures and equipment manuals remain authoritative.

Diagnostic symptoms, inspection points, interpretations and next actions for Relay versus contactor comparison: implementation, evidence and troubleshooting
Observed symptomInspectInterpretationNext proving action
The expected result is unclearRequirement, initial state, actor, stimulus, units and pass conditionThe evaluator, instructor and technical buyer may be solving different versions of the task.Rewrite one observable acceptance case before continuing.
Internal state changes but the outcome does notRequest, final owner, output or service boundary and independent feedbackA software or interface indication proves intent at one layer, not the complete outcome.Trace the first boundary after the changing state.
Normal case passes but an edge case failsLimits, timing, simultaneous events, reset and restart assumptionsThe implementation contains a hidden assumption exposed by the changed condition.Add the failed boundary as a permanent regression case.
The failure disappears after resetOriginal symptom, histories, diagnostics, timestamps and active causeReset changed evidence or state without proving the initiating cause.Reproduce under a controlled condition and preserve pre/post-event data.
Simulator and target disagreeModel boundary, software version, task timing, I/O behavior, data types and configurationA learning model and the intended target do not share one of the recorded assumptions.Reduce the case and verify against current target documentation.
The result cannot be explainedPrediction, observation, proving action, alternative hypotheses and limitationsActivity occurred but the evidence is not yet transferable or reviewable.Have the learner defend the signal path and repeat a changed case.

Product evidence / 05

What the browser practice can actually demonstrate

The public product surface exposes runnable examples, capability boundaries, pricing context and test-harness behavior that can be checked before a purchasing decision.

Where simulation stops

A generic comparison cannot select a real switching device, protection or enclosure; use current manufacturer data, standards and qualified design review.

Commissioning notebook / 06

Six cases that turn the concepts into evidence

Use these as written briefs rather than click-through instructions. For every case, state the expected condition before acting, retain the first useful observation and explain why the final result proves the requirement. A different program or component choice can still be correct when it produces the same bounded behavior and evidence.

Case 01

predict → observe → prove

Prove define the operating contract

Engineering context. load type, voltage, current, utilization duty, poles, isolation, coil rating, PLC output capacity, interface need, auxiliary contacts, overload protection, endurance and environment. For relay and contactor selection, interfaces, ratings and diagnostic evidence, record the initial condition, actor, requested change, observable result and stopping condition before selecting a tool or implementation. Begin with a written normal condition and identify which request, state, physical result or communication value will provide independent confirmation. Do not begin by changing the configuration; the initial state is part of the evidence and should remain reproducible.

Controlled setup. Use the “Write the acceptance case” stage of the workflow: convert load type, voltage, current, utilization duty, poles, isolation, coil rating, plc output capacity, interface need, auxiliary contacts, overload protection, endurance and environment into initial conditions, one stimulus and observable pass criteria. The acceptance record should show this result: another person can repeat the case without guessing the intended result. Record initial conditions, the exact stimulus and the observation point so another learner can repeat the case without relying on your memory.

Fault challenge. Introduce or analyse “The expected result is unclear” as one bounded deviation. Inspect requirement, initial state, actor, stimulus, units and pass condition The working interpretation is that the evaluator, instructor and technical buyer may be solving different versions of the task. The next proving action is to rewrite one observable acceptance case before continuing. Change only one condition before observing the result, and preserve timestamps or measurements where timing matters.

Review and recovery. The most common trap here is using page completion or an animation as the acceptance criterion. After restoring the cause, repeat the normal case and at least one stop, timeout, disconnect or restart boundary relevant to this topic. Remove temporary forces and bypasses, return the model to a known state and retain the evidence that both operation and recovery are deliberate.

Explain it aloud: What is the main difference between a relay and a contactor? A defensible short answer is: Both are electrically operated switches, but contactors are commonly designed and rated for repeated switching of higher-power loads with coordinated motor-control accessories.

Case 02

predict → observe → prove

Prove map the evidence path

Engineering context. PLC or control command through interface and coil to mechanical contacts, load current, equipment response and independent feedback. Separate request, internal state, output or service, physical or user-visible result and independent feedback so each boundary can be inspected. Begin with a written normal condition and identify which request, state, physical result or communication value will provide independent confirmation. Do not begin by changing the configuration; the initial state is part of the evidence and should remain reproducible.

Controlled setup. Use the “Build the map” stage of the workflow: document plc or control command through interface and coil to mechanical contacts, load current, equipment response and independent feedback and name who owns each state or decision. The acceptance record should show this result: every request and result has a source, destination and useful inspection point. Record initial conditions, the exact stimulus and the observation point so another learner can repeat the case without relying on your memory.

Fault challenge. Introduce or analyse “Internal state changes but the outcome does not” as one bounded deviation. Inspect request, final owner, output or service boundary and independent feedback The working interpretation is that a software or interface indication proves intent at one layer, not the complete outcome. The next proving action is to trace the first boundary after the changing state. Change only one condition before observing the result, and preserve timestamps or measurements where timing matters.

Review and recovery. The most common trap here is using the same value as command, status and independent feedback. After restoring the cause, repeat the normal case and at least one stop, timeout, disconnect or restart boundary relevant to this topic. Remove temporary forces and bypasses, return the model to a known state and retain the evidence that both operation and recovery are deliberate.

Explain it aloud: Can a PLC output drive a contactor coil directly? A defensible short answer is: Only when output and coil electrical specifications, inrush, suppression and protection are compatible; an interface relay is often used but is not automatically required.

Case 03

predict → observe → prove

Prove prove normal operation

Engineering context. the selected device repeatedly switches the representative load within documented ratings and produces trustworthy auxiliary feedback. Run more than one cycle from a known state and retain the values, timings or artifacts that demonstrate repeatability. Begin with a written normal condition and identify which request, state, physical result or communication value will provide independent confirmation. Do not begin by changing the configuration; the initial state is part of the evidence and should remain reproducible.

Controlled setup. Use the “Run the baseline” stage of the workflow: apply the selected device repeatedly switches the representative load within documented ratings and produces trustworthy auxiliary feedback from a clean start and record the expected evidence. The acceptance record should show this result: repeated runs produce the same bounded result. Record initial conditions, the exact stimulus and the observation point so another learner can repeat the case without relying on your memory.

Fault challenge. Introduce or analyse “Normal case passes but an edge case fails” as one bounded deviation. Inspect limits, timing, simultaneous events, reset and restart assumptions The working interpretation is that the implementation contains a hidden assumption exposed by the changed condition. The next proving action is to add the failed boundary as a permanent regression case. Change only one condition before observing the result, and preserve timestamps or measurements where timing matters.

Review and recovery. The most common trap here is changing several parameters before a baseline exists. After restoring the cause, repeat the normal case and at least one stop, timeout, disconnect or restart boundary relevant to this topic. Remove temporary forces and bypasses, return the model to a known state and retain the evidence that both operation and recovery are deliberate.

Explain it aloud: What should I learn first about relay and contactor selection, interfaces, ratings and diagnostic evidence? A defensible short answer is: Start with the operating contract and evidence path: load type, voltage, current, utilization duty, poles, isolation, coil rating, plc output capacity, interface need, auxiliary contacts, overload protection, endurance and environment, followed by plc or control command through interface and coil to mechanical contacts, load current, equipment response and independent feedback. Add advanced features only after the baseline is predictable.

Case 04

predict → observe → prove

Prove exercise a boundary case

Engineering context. inrush, inductive release, rapid cycling, welded contact, open coil, wrong coil voltage, overloaded output, lost phase and enclosure temperature. Choose minimum, maximum, simultaneous, delayed or restart conditions that reveal assumptions hidden by the happy path. Begin with a written normal condition and identify which request, state, physical result or communication value will provide independent confirmation. Do not begin by changing the configuration; the initial state is part of the evidence and should remain reproducible.

Controlled setup. Use the “Challenge assumptions” stage of the workflow: test inrush, inductive release, rapid cycling, welded contact, open coil, wrong coil voltage, overloaded output, lost phase and enclosure temperature without changing the acceptance contract. The acceptance record should show this result: limits, timing and restart behavior reach defined states. Record initial conditions, the exact stimulus and the observation point so another learner can repeat the case without relying on your memory.

Fault challenge. Introduce or analyse “The failure disappears after reset” as one bounded deviation. Inspect original symptom, histories, diagnostics, timestamps and active cause The working interpretation is that reset changed evidence or state without proving the initiating cause. The next proving action is to reproduce under a controlled condition and preserve pre/post-event data. Change only one condition before observing the result, and preserve timestamps or measurements where timing matters.

Review and recovery. The most common trap here is testing only one ideal sequence. After restoring the cause, repeat the normal case and at least one stop, timeout, disconnect or restart boundary relevant to this topic. Remove temporary forces and bypasses, return the model to a known state and retain the evidence that both operation and recovery are deliberate.

Explain it aloud: How do I practise relay and contactor selection, interfaces, ratings and diagnostic evidence effectively? A defensible short answer is: Use short cases with known initial conditions, a written prediction, one action and an observable result. Then alter a boundary or fault and explain why the evidence changed.

Case 05

predict → observe → prove

Prove diagnose a controlled fault

Engineering context. a requirement, rating, duty, coil, interface, contact, protection, feedback or environment mismatch. Preserve the first symptom, divide the system at a measurable boundary and change one condition only after predicting the result. Begin with a written normal condition and identify which request, state, physical result or communication value will provide independent confirmation. Do not begin by changing the configuration; the initial state is part of the evidence and should remain reproducible.

Controlled setup. Use the “Isolate one failure” stage of the workflow: introduce or analyse a requirement, rating, duty, coil, interface, contact, protection, feedback or environment mismatch and locate the first disagreement. The acceptance record should show this result: the proving action distinguishes the leading hypotheses. Record initial conditions, the exact stimulus and the observation point so another learner can repeat the case without relying on your memory.

Fault challenge. Introduce or analyse “Simulator and target disagree” as one bounded deviation. Inspect model boundary, software version, task timing, I/O behavior, data types and configuration The working interpretation is that a learning model and the intended target do not share one of the recorded assumptions. The next proving action is to reduce the case and verify against current target documentation. Change only one condition before observing the result, and preserve timestamps or measurements where timing matters.

Review and recovery. The most common trap here is resetting, forcing or replacing before evidence is retained. After restoring the cause, repeat the normal case and at least one stop, timeout, disconnect or restart boundary relevant to this topic. Remove temporary forces and bypasses, return the model to a known state and retain the evidence that both operation and recovery are deliberate.

Explain it aloud: What counts as proof of competence? A defensible short answer is: A repeatable artifact or system result plus an explanation of the signal path is stronger than time spent, screenshots or a copied answer. Physical competence requires separate supervised evidence.

Case 06

predict → observe → prove

Prove transfer and hand over

Engineering context. the exact device and protection selected and validated from current data and target tests. Restore normal state, remove temporary changes, repeat affected checks and document which claims remain limited to the learning environment. Begin with a written normal condition and identify which request, state, physical result or communication value will provide independent confirmation. Do not begin by changing the configuration; the initial state is part of the evidence and should remain reproducible.

Controlled setup. Use the “Close the evidence loop” stage of the workflow: complete the exact device and protection selected and validated from current data and target tests and repeat the affected regression cases. The acceptance record should show this result: an evaluation is complete when the same representative job is tested in each candidate and differences are recorded as evidence rather than inferred from feature labels. Record initial conditions, the exact stimulus and the observation point so another learner can repeat the case without relying on your memory.

Fault challenge. Introduce or analyse “The result cannot be explained” as one bounded deviation. Inspect prediction, observation, proving action, alternative hypotheses and limitations The working interpretation is that activity occurred but the evidence is not yet transferable or reviewable. The next proving action is to have the learner defend the signal path and repeat a changed case. Change only one condition before observing the result, and preserve timestamps or measurements where timing matters.

Review and recovery. The most common trap here is treating an acknowledged message or one successful rerun as handover. After restoring the cause, repeat the normal case and at least one stop, timeout, disconnect or restart boundary relevant to this topic. Remove temporary forces and bypasses, return the model to a known state and retain the evidence that both operation and recovery are deliberate.

Explain it aloud: Why test faults and restart behavior? A defensible short answer is: Because a requirement, rating, duty, coil, interface, contact, protection, feedback or environment mismatch or inrush, inductive release, rapid cycling, welded contact, open coil, wrong coil voltage, overloaded output, lost phase and enclosure temperature can expose assumptions that never appear during ideal startup and steady operation.

Answer surface / 07

Questions people ask about Relay versus contactor comparison

These concise answers define the operating, training and product boundaries most often missed in broad summaries. The full workflow and diagnostic table above provide the evidence behind them.

What is the main difference between a relay and a contactor?

Both are electrically operated switches, but contactors are commonly designed and rated for repeated switching of higher-power loads with coordinated motor-control accessories.

Can a PLC output drive a contactor coil directly?

Only when output and coil electrical specifications, inrush, suppression and protection are compatible; an interface relay is often used but is not automatically required.

What should I learn first about relay and contactor selection, interfaces, ratings and diagnostic evidence?

Start with the operating contract and evidence path: load type, voltage, current, utilization duty, poles, isolation, coil rating, plc output capacity, interface need, auxiliary contacts, overload protection, endurance and environment, followed by plc or control command through interface and coil to mechanical contacts, load current, equipment response and independent feedback. Add advanced features only after the baseline is predictable.

How do I practise relay and contactor selection, interfaces, ratings and diagnostic evidence effectively?

Use short cases with known initial conditions, a written prediction, one action and an observable result. Then alter a boundary or fault and explain why the evidence changed.

What counts as proof of competence?

A repeatable artifact or system result plus an explanation of the signal path is stronger than time spent, screenshots or a copied answer. Physical competence requires separate supervised evidence.

Why test faults and restart behavior?

Because a requirement, rating, duty, coil, interface, contact, protection, feedback or environment mismatch or inrush, inductive release, rapid cycling, welded contact, open coil, wrong coil voltage, overloaded output, lost phase and enclosure temperature can expose assumptions that never appear during ideal startup and steady operation.

Can browser practice replace official software or hardware?

No. It can build concepts and diagnostic reasoning. Exact firmware, I/O electrical behavior, networking, safety and commissioning require current official tools, documentation and target equipment.

How should progress be documented?

Keep the requirement, initial state, program or configuration, observed values, fault hypothesis, proving action, recovery result and a concise limitations statement.