PLC Simulator
PLC field notessensors

Inductive vs Capacitive Proximity Sensors: Which One Do You Need?

Inductive sensors detect metal only. Capacitive sensors detect anything — metal, plastic, liquid, or powder. Learn how each works, how to wire NPN vs PNP output, and how to pick the right sensor for your application.

PLC Simulation Software8 min read

TL;DR: An inductive proximity sensor detects metallic targets only — it ignores plastic, cardboard, and liquids completely. A capacitive proximity sensor detects any material with a dielectric constant greater than air: metal, plastic, glass, liquids, and granular solids. Both are 3-wire sensors using the same NPN/PNP wiring convention. Choose inductive for metal-only detection in harsh environments; choose capacitive when the target is non-metallic or when you need to sense through a container wall.
Inductive vs capacitive proximity sensor — working principle, detection range, and applications

The most common selection mistake in discrete sensor applications is reaching for a proximity sensor without knowing which type to buy. The confusion is understandable — both sensors look similar (M12 or M18 or M30 cylindrical bodies), both use 3-wire cables, both output a switched discrete signal to the PLC. The difference is entirely in the physics of detection — and that difference dictates every application decision.

How Inductive Proximity Sensors Work

An inductive proximity sensor contains a coil and oscillator circuit behind the sensing face. The oscillator generates a high-frequency electromagnetic field that projects from the face. When a conductive (metallic) target enters this field, eddy currents are induced in the metal. These eddy currents absorb energy from the oscillator, damping its amplitude. The sensor's electronics detect the amplitude change and switch the output.

Because the operating principle requires eddy current induction, the target must be electrically conductive. Ferrous metals (mild steel, cast iron) give the best response. Non-ferrous metals (aluminium, stainless steel, copper) give 30–80% of the rated range. Non-metallic objects — plastic, glass, wood, cardboard, water — produce zero eddy currents and are completely invisible to an inductive sensor.

The sensing face is typically marked as shielded (flush) or unshielded (non-flush):

  • Shielded: the electromagnetic field is contained within the sensor face. Can be flush-mounted in a metal bracket without false triggering from the bracket itself. Shorter range.
  • Unshielded: the field projects beyond the sensor body. Longer range, but requires a metal-free zone around the sensing face (the "exclusion zone" in the datasheet).

How Capacitive Proximity Sensors Work

A capacitive proximity sensor contains two internal electrodes connected to a high-frequency oscillator. The electrodes form a capacitor with the material in front of the face — the capacitance depends on the dielectric constant of that material. Air has a dielectric constant (εr) of approximately 1.0. Any solid or liquid has a higher dielectric constant: water ≈ 80, most plastics ≈ 2–5, glass ≈ 6, grain/powder ≈ 2–4.

When a target enters the sensing field, the increased dielectric constant raises the capacitance. The oscillator detects the change and switches the output. Because the principle works on dielectric change rather than conductivity, any material above air dielectric will trigger the sensor — metal, plastic, liquid, or granular.

A key feature unique to capacitive sensors is the sensitivity adjustment potentiometer on the body. This lets you tune the detection threshold for your specific target material and container. You typically turn sensitivity down to just above the point where the sensor ignores the empty container wall, so only the material inside triggers it.
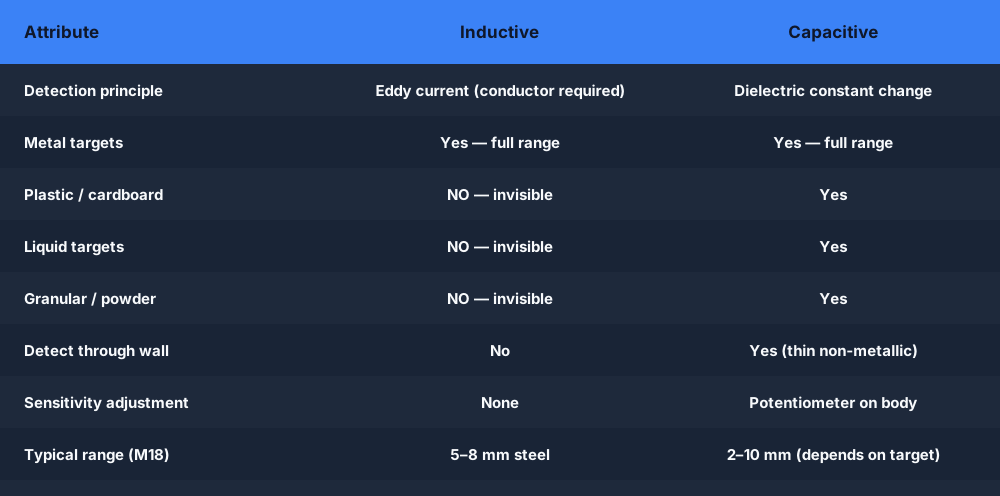
Capacitive vs inductive proximity sensor — detection principle, field projection, and target material comparison

Side-by-Side Comparison

Reference tableSwipe
InductiveCapacitive
Detection principleEddy current dampingDielectric constant change
Target materialsMetallic conductors onlyAny material (metal, plastic, liquid, powder)
Detects through walls?NoYes (thin non-metallic walls)
Typical sensing range1–20 mm (depends on material)2–25 mm (depends on sensitivity setting)
Sensitivity adjustmentNonePotentiometer on body
Best forMetal part detection in oily/coolant environmentsNon-metallic targets, level detection through tank wall
Environmental resistanceExcellent (IP67–IP69K, immune to coolant/oil)Good, but surface contamination can cause false triggers
Output typesNPN / PNP, NO / NCNPN / PNP, NO / NC
Relative costLowerSlightly higher

NPN vs PNP Wiring — Both Sensor Types

Both inductive and capacitive sensors use the same 3-wire connection:

  • Brown wire: +24 V DC supply
  • Blue wire: 0 V / common
  • Black wire: signal output

The output type — NPN or PNP — determines which direction the signal wire switches:

NPN (current sinking, open collector to 0V): The signal wire pulls LOW (to 0V) when the sensor detects a target. The PLC input must be sourcing type (PNP input, positive common). NPN sensors are common in equipment made in Asia.

PNP (current sourcing, switches to +24V): The signal wire pulls HIGH (to +24 V) when the sensor detects a target. The PLC input must be sinking type (NPN input, 0V common). PNP sensors are standard in European and North American practice.

Most PLC input modules work with PNP sensors directly. If you have an NPN sensor and a PNP-input PLC module, you need a signal converter or to swap to a PNP sensor — mixing NPN and PNP is the most common wiring mistake on the factory floor.

The interactive capacitive proximity sensor and inductive proximity sensor animations show the NPN output switching in real time — watch the signal wire go low when the target enters range.

When to Use Inductive

  • Detecting whether a metal part is seated in a fixture before a press, robot, or clamp operates
  • Position feedback on cylinders, slides, or cam lobes (all metallic)
  • Counting metal objects on a conveyor (bottle caps, nuts, metal stampings)
  • Environments with cutting fluid, coolant, oil mist — inductive sensors are generally more resistant to surface contamination than capacitive (no sensitivity drift from liquid on the face)
  • Applications where you must not detect plastic fixtures or cardboard packaging accidentally

When to Use Capacitive

  • Detecting plastic bottles, bags, or cartons that an inductive sensor cannot see
  • Level sensing through a tank wall — mount the sensor against the outside of a plastic or glass vessel; the dielectric change when liquid is present inside triggers the sensor without penetrating the vessel
  • Granular material in hoppers, chutes, or silos (grain, pellets, powder)
  • Liquid level in a pipe or vessel without a probe inserted into the process
  • Applications where the target material varies and you need a sensor that works on everything

Common Application Examples

Beverage filling line: A capacitive sensor mounted outside the PET bottle confirms the bottle is filled. The water inside (εr ≈ 80) is detected through the 2 mm bottle wall. An inductive sensor on the same line detects whether the metal bottle cap is present after capping — the two sensor types complement each other in the same machine.

Injection moulding machine: Inductive sensors detect the position of the metallic mould carrier. Capacitive sensors detect whether plastic material is present in the hopper, giving a low-material alarm before the machine runs dry.

Conveyor sorting: An inductive sensor detects metallic components; a capacitive sensor detects all components (metallic and non-metallic) — both signals feed PLC inputs for a two-stage sorting gate.

Frequently Asked Questions

Q: Can a capacitive sensor detect metal?

A: Yes. Metal has a high dielectric constant and is a very good conductor, so a capacitive sensor will detect metallic targets reliably. However, an inductive sensor is better for metal-only detection in oily environments because it is immune to surface contamination and does not require sensitivity adjustment. Use capacitive only when you also need to detect non-metallic targets.

Q: Can an inductive sensor detect aluminium or stainless steel?

A: Yes, but with reduced range. The datasheet correction factor for aluminium is typically 0.35–0.45 (so a sensor with a 10 mm nominal range has about 3.5–4.5 mm effective range on aluminium). Stainless steel is 0.7–0.85. The nominal sensing range is always specified for mild steel — read the correction table for the actual target material.

Q: My capacitive sensor keeps triggering falsely. What is wrong?

A: The three most common causes are: (1) sensitivity set too high — back off the potentiometer until the sensor ignores background objects; (2) condensation or liquid on the sensing face — the film changes the dielectric and causes false triggers; (3) ground loops in the cable shield — if you are running cable in a conduit with other signals, ensure shields are grounded at one end only. A fourth cause is proximity to another capacitive sensor — adjacent sensors can crosstalk; increase the spacing to at least 3× the sensing range.

Q: What does the correction factor on an inductive sensor datasheet mean?

A: The nominal sensing range (Sn) is measured with a mild steel square target. The correction factor multiplies that range for other metals: stainless steel 0.7–0.85, brass 0.35–0.50, aluminium 0.35–0.45. If your actual target is not mild steel, multiply Sn by the correction factor to get the effective range for your application — and add a 20% margin so vibration and mounting tolerance do not push the target outside detection range.


Practice connecting discrete sensors in PLC ladder logic with the free motor start-stop scenario — it models sensor inputs exactly as you would wire them on the machine.

Explore the interactive animations for both sensor types:

ShareX / TwitterLinkedIn

From reading to running logic

Practice this yourself in the simulator

Start with guided PLC practice in your browser. No install and no credit card required.

Start practising free

Continue learning

Related field notes

All articles
sensors
encoder

Incremental vs Absolute Encoder: Position Feedback for PLC Applications

Incremental encoders output a pulse train — you count pulses to track relative position, but lose it on power loss. Absolute encoders output a unique digital word for every shaft position — position is retained across power cycles. Learn when to use each, how to wire them, and how PLCs read both types.

9 min read
communications
modbus

Modbus vs PROFIBUS: Two Industrial Protocols, Very Different Eras

Modbus vs PROFIBUS compared: register model vs device profile, RS-485 vs RS-485 DP, speed, diagnostics, vendor support, and when each protocol still makes sense in 2026.

9 min read
communications
modbus

Modbus vs RS-485: Protocol vs Physical Layer — The Confusion Explained

Modbus is a communication protocol. RS-485 is an electrical standard for wiring. They are not the same thing — Modbus RTU runs on RS-485, but so does PROFIBUS. Here is the difference, why it matters, and how to wire it correctly.

8 min read

Software evaluation field guide

Inductive versus capacitive proximity sensors: implementation, evidence and troubleshooting

Direct answer

Inductive versus capacitive proximity sensors becomes useful when it connects target material, size, shape, distance, orientation, speed, background, flush mounting, environment, contamination, output type, input compatibility and failure state with target interaction through electromagnetic or electric-field sensing, output stage, wiring, plc input, logic decision and independent target evidence, then proves representative minimum and maximum targets detected repeatably across the declared position and speed window under normal, boundary, fault and recovery conditions. The objective is a repeatable engineering or learning result, not merely activity inside a page or tool.

This guide is written for automation technicians and designers choosing non-contact presence sensing for metal, non-metal, powder, liquid and packaging targets. The intended result is specific: the reader can compare target, range, environment, mounting and failure evidence, then run representative target tests before selecting a technology.

an isolated instrumentation bench connecting realistic sensors, signal conditioning, PLC channels and measurement evidence while studying inductive and capacitive proximity-sensor selection and diagnosis
The scene keeps inductive and capacitive proximity-sensor selection and diagnosis attached to declared conditions, observable results, diagnostic boundaries and evidence another person can reproduce.

System map / 02

Six concepts that control the result

Treat these as connected checkpoints. Each checkpoint has an expected state, an observable state and a boundary to the next part of the system. That structure prevents a software indication from being mistaken for physical proof.

NODE 01observable

Define the operating contract

target material, size, shape, distance, orientation, speed, background, flush mounting, environment, contamination, output type, input compatibility and failure state. For inductive and capacitive proximity-sensor selection and diagnosis, record the initial condition, actor, requested change, observable result and stopping condition before selecting a tool or implementation.

NODE 02observable

Map the evidence path

target interaction through electromagnetic or electric-field sensing, output stage, wiring, PLC input, logic decision and independent target evidence. Separate request, internal state, output or service, physical or user-visible result and independent feedback so each boundary can be inspected.

NODE 03observable

Prove normal operation

representative minimum and maximum targets detected repeatably across the declared position and speed window. Run more than one cycle from a known state and retain the values, timings or artifacts that demonstrate repeatability.

NODE 04observable

Exercise a boundary case

small target, angled pass, buildup, moisture, nearby metal, sensitivity drift, cable fault, slow edge, restart and background change. Choose minimum, maximum, simultaneous, delayed or restart conditions that reveal assumptions hidden by the happy path.

NODE 05observable

Diagnose a controlled fault

a target, principle, range, mounting, environment, adjustment, output, wiring, input or interpretation mismatch. Preserve the first symptom, divide the system at a measurable boundary and change one condition only after predicting the result.

NODE 06observable

Transfer and hand over

shortlisted sensors tested on actual targets and mounting with current device data and machine conditions. Restore normal state, remove temporary changes, repeat affected checks and document which claims remain limited to the learning environment.

Procedure / 03

A six-step practice and commissioning workflow

Run the steps in order the first time. Later, the same structure becomes a diagnostic loop: define the expected condition, observe the boundary, interpret the difference and choose one proving action.

  1. 01

    Write the acceptance case

    Convert target material, size, shape, distance, orientation, speed, background, flush mounting, environment, contamination, output type, input compatibility and failure state into initial conditions, one stimulus and observable pass criteria.

    Evidence: Another person can repeat the case without guessing the intended result.

    Avoid: Using page completion or an animation as the acceptance criterion.

  2. 02

    Build the map

    Document target interaction through electromagnetic or electric-field sensing, output stage, wiring, plc input, logic decision and independent target evidence and name who owns each state or decision.

    Evidence: Every request and result has a source, destination and useful inspection point.

    Avoid: Using the same value as command, status and independent feedback.

  3. 03

    Run the baseline

    Apply representative minimum and maximum targets detected repeatably across the declared position and speed window from a clean start and record the expected evidence.

    Evidence: Repeated runs produce the same bounded result.

    Avoid: Changing several parameters before a baseline exists.

  4. 04

    Challenge assumptions

    Test small target, angled pass, buildup, moisture, nearby metal, sensitivity drift, cable fault, slow edge, restart and background change without changing the acceptance contract.

    Evidence: Limits, timing and restart behavior reach defined states.

    Avoid: Testing only one ideal sequence.

  5. 05

    Isolate one failure

    Introduce or analyse a target, principle, range, mounting, environment, adjustment, output, wiring, input or interpretation mismatch and locate the first disagreement.

    Evidence: The proving action distinguishes the leading hypotheses.

    Avoid: Resetting, forcing or replacing before evidence is retained.

  6. 06

    Close the evidence loop

    Complete shortlisted sensors tested on actual targets and mounting with current device data and machine conditions and repeat the affected regression cases.

    Evidence: An evaluation is complete when the same representative job is tested in each candidate and differences are recorded as evidence rather than inferred from feature labels.

    Avoid: Treating an acknowledged message or one successful rerun as handover.

Diagnostic matrix / 04

Symptoms, proving points and next actions

The table is a reasoning aid, not a parts-replacement chart. Preserve the initial symptom, inspect the named boundary and use the interpretation to choose the next controlled test. Site safety procedures and equipment manuals remain authoritative.

Diagnostic symptoms, inspection points, interpretations and next actions for Inductive versus capacitive proximity sensors: implementation, evidence and troubleshooting
Observed symptomInspectInterpretationNext proving action
The expected result is unclearRequirement, initial state, actor, stimulus, units and pass conditionThe evaluator, instructor and technical buyer may be solving different versions of the task.Rewrite one observable acceptance case before continuing.
Internal state changes but the outcome does notRequest, final owner, output or service boundary and independent feedbackA software or interface indication proves intent at one layer, not the complete outcome.Trace the first boundary after the changing state.
Normal case passes but an edge case failsLimits, timing, simultaneous events, reset and restart assumptionsThe implementation contains a hidden assumption exposed by the changed condition.Add the failed boundary as a permanent regression case.
The failure disappears after resetOriginal symptom, histories, diagnostics, timestamps and active causeReset changed evidence or state without proving the initiating cause.Reproduce under a controlled condition and preserve pre/post-event data.
Simulator and target disagreeModel boundary, software version, task timing, I/O behavior, data types and configurationA learning model and the intended target do not share one of the recorded assumptions.Reduce the case and verify against current target documentation.
The result cannot be explainedPrediction, observation, proving action, alternative hypotheses and limitationsActivity occurred but the evidence is not yet transferable or reviewable.Have the learner defend the signal path and repeat a changed case.

Product evidence / 05

What the browser practice can actually demonstrate

The public product surface exposes runnable examples, capability boundaries, pricing context and test-harness behavior that can be checked before a purchasing decision.

Where simulation stops

A general comparison cannot guarantee target detection, sensing distance, chemical resistance, hazardous-area suitability or machine safety for a specific device.

Commissioning notebook / 06

Six cases that turn the concepts into evidence

Use these as written briefs rather than click-through instructions. For every case, state the expected condition before acting, retain the first useful observation and explain why the final result proves the requirement. A different program or component choice can still be correct when it produces the same bounded behavior and evidence.

Case 01

predict → observe → prove

Prove define the operating contract

Engineering context. target material, size, shape, distance, orientation, speed, background, flush mounting, environment, contamination, output type, input compatibility and failure state. For inductive and capacitive proximity-sensor selection and diagnosis, record the initial condition, actor, requested change, observable result and stopping condition before selecting a tool or implementation. Begin with a written normal condition and identify which request, state, physical result or communication value will provide independent confirmation. Do not begin by changing the configuration; the initial state is part of the evidence and should remain reproducible.

Controlled setup. Use the “Write the acceptance case” stage of the workflow: convert target material, size, shape, distance, orientation, speed, background, flush mounting, environment, contamination, output type, input compatibility and failure state into initial conditions, one stimulus and observable pass criteria. The acceptance record should show this result: another person can repeat the case without guessing the intended result. Record initial conditions, the exact stimulus and the observation point so another learner can repeat the case without relying on your memory.

Fault challenge. Introduce or analyse “The expected result is unclear” as one bounded deviation. Inspect requirement, initial state, actor, stimulus, units and pass condition The working interpretation is that the evaluator, instructor and technical buyer may be solving different versions of the task. The next proving action is to rewrite one observable acceptance case before continuing. Change only one condition before observing the result, and preserve timestamps or measurements where timing matters.

Review and recovery. The most common trap here is using page completion or an animation as the acceptance criterion. After restoring the cause, repeat the normal case and at least one stop, timeout, disconnect or restart boundary relevant to this topic. Remove temporary forces and bypasses, return the model to a known state and retain the evidence that both operation and recovery are deliberate.

Explain it aloud: When should I use an inductive sensor? A defensible short answer is: Inductive proximity sensors are commonly used for metallic targets, subject to target size, material correction, range, mounting and environment.

Case 02

predict → observe → prove

Prove map the evidence path

Engineering context. target interaction through electromagnetic or electric-field sensing, output stage, wiring, PLC input, logic decision and independent target evidence. Separate request, internal state, output or service, physical or user-visible result and independent feedback so each boundary can be inspected. Begin with a written normal condition and identify which request, state, physical result or communication value will provide independent confirmation. Do not begin by changing the configuration; the initial state is part of the evidence and should remain reproducible.

Controlled setup. Use the “Build the map” stage of the workflow: document target interaction through electromagnetic or electric-field sensing, output stage, wiring, plc input, logic decision and independent target evidence and name who owns each state or decision. The acceptance record should show this result: every request and result has a source, destination and useful inspection point. Record initial conditions, the exact stimulus and the observation point so another learner can repeat the case without relying on your memory.

Fault challenge. Introduce or analyse “Internal state changes but the outcome does not” as one bounded deviation. Inspect request, final owner, output or service boundary and independent feedback The working interpretation is that a software or interface indication proves intent at one layer, not the complete outcome. The next proving action is to trace the first boundary after the changing state. Change only one condition before observing the result, and preserve timestamps or measurements where timing matters.

Review and recovery. The most common trap here is using the same value as command, status and independent feedback. After restoring the cause, repeat the normal case and at least one stop, timeout, disconnect or restart boundary relevant to this topic. Remove temporary forces and bypasses, return the model to a known state and retain the evidence that both operation and recovery are deliberate.

Explain it aloud: When is a capacitive sensor useful? A defensible short answer is: Capacitive sensing can detect many non-metal materials and levels, but sensitivity to moisture, buildup, background and adjustment must be tested.

Case 03

predict → observe → prove

Prove prove normal operation

Engineering context. representative minimum and maximum targets detected repeatably across the declared position and speed window. Run more than one cycle from a known state and retain the values, timings or artifacts that demonstrate repeatability. Begin with a written normal condition and identify which request, state, physical result or communication value will provide independent confirmation. Do not begin by changing the configuration; the initial state is part of the evidence and should remain reproducible.

Controlled setup. Use the “Run the baseline” stage of the workflow: apply representative minimum and maximum targets detected repeatably across the declared position and speed window from a clean start and record the expected evidence. The acceptance record should show this result: repeated runs produce the same bounded result. Record initial conditions, the exact stimulus and the observation point so another learner can repeat the case without relying on your memory.

Fault challenge. Introduce or analyse “Normal case passes but an edge case fails” as one bounded deviation. Inspect limits, timing, simultaneous events, reset and restart assumptions The working interpretation is that the implementation contains a hidden assumption exposed by the changed condition. The next proving action is to add the failed boundary as a permanent regression case. Change only one condition before observing the result, and preserve timestamps or measurements where timing matters.

Review and recovery. The most common trap here is changing several parameters before a baseline exists. After restoring the cause, repeat the normal case and at least one stop, timeout, disconnect or restart boundary relevant to this topic. Remove temporary forces and bypasses, return the model to a known state and retain the evidence that both operation and recovery are deliberate.

Explain it aloud: What should I learn first about inductive and capacitive proximity-sensor selection and diagnosis? A defensible short answer is: Start with the operating contract and evidence path: target material, size, shape, distance, orientation, speed, background, flush mounting, environment, contamination, output type, input compatibility and failure state, followed by target interaction through electromagnetic or electric-field sensing, output stage, wiring, plc input, logic decision and independent target evidence. Add advanced features only after the baseline is predictable.

Case 04

predict → observe → prove

Prove exercise a boundary case

Engineering context. small target, angled pass, buildup, moisture, nearby metal, sensitivity drift, cable fault, slow edge, restart and background change. Choose minimum, maximum, simultaneous, delayed or restart conditions that reveal assumptions hidden by the happy path. Begin with a written normal condition and identify which request, state, physical result or communication value will provide independent confirmation. Do not begin by changing the configuration; the initial state is part of the evidence and should remain reproducible.

Controlled setup. Use the “Challenge assumptions” stage of the workflow: test small target, angled pass, buildup, moisture, nearby metal, sensitivity drift, cable fault, slow edge, restart and background change without changing the acceptance contract. The acceptance record should show this result: limits, timing and restart behavior reach defined states. Record initial conditions, the exact stimulus and the observation point so another learner can repeat the case without relying on your memory.

Fault challenge. Introduce or analyse “The failure disappears after reset” as one bounded deviation. Inspect original symptom, histories, diagnostics, timestamps and active cause The working interpretation is that reset changed evidence or state without proving the initiating cause. The next proving action is to reproduce under a controlled condition and preserve pre/post-event data. Change only one condition before observing the result, and preserve timestamps or measurements where timing matters.

Review and recovery. The most common trap here is testing only one ideal sequence. After restoring the cause, repeat the normal case and at least one stop, timeout, disconnect or restart boundary relevant to this topic. Remove temporary forces and bypasses, return the model to a known state and retain the evidence that both operation and recovery are deliberate.

Explain it aloud: How do I practise inductive and capacitive proximity-sensor selection and diagnosis effectively? A defensible short answer is: Use short cases with known initial conditions, a written prediction, one action and an observable result. Then alter a boundary or fault and explain why the evidence changed.

Case 05

predict → observe → prove

Prove diagnose a controlled fault

Engineering context. a target, principle, range, mounting, environment, adjustment, output, wiring, input or interpretation mismatch. Preserve the first symptom, divide the system at a measurable boundary and change one condition only after predicting the result. Begin with a written normal condition and identify which request, state, physical result or communication value will provide independent confirmation. Do not begin by changing the configuration; the initial state is part of the evidence and should remain reproducible.

Controlled setup. Use the “Isolate one failure” stage of the workflow: introduce or analyse a target, principle, range, mounting, environment, adjustment, output, wiring, input or interpretation mismatch and locate the first disagreement. The acceptance record should show this result: the proving action distinguishes the leading hypotheses. Record initial conditions, the exact stimulus and the observation point so another learner can repeat the case without relying on your memory.

Fault challenge. Introduce or analyse “Simulator and target disagree” as one bounded deviation. Inspect model boundary, software version, task timing, I/O behavior, data types and configuration The working interpretation is that a learning model and the intended target do not share one of the recorded assumptions. The next proving action is to reduce the case and verify against current target documentation. Change only one condition before observing the result, and preserve timestamps or measurements where timing matters.

Review and recovery. The most common trap here is resetting, forcing or replacing before evidence is retained. After restoring the cause, repeat the normal case and at least one stop, timeout, disconnect or restart boundary relevant to this topic. Remove temporary forces and bypasses, return the model to a known state and retain the evidence that both operation and recovery are deliberate.

Explain it aloud: What counts as proof of competence? A defensible short answer is: A repeatable artifact or system result plus an explanation of the signal path is stronger than time spent, screenshots or a copied answer. Physical competence requires separate supervised evidence.

Case 06

predict → observe → prove

Prove transfer and hand over

Engineering context. shortlisted sensors tested on actual targets and mounting with current device data and machine conditions. Restore normal state, remove temporary changes, repeat affected checks and document which claims remain limited to the learning environment. Begin with a written normal condition and identify which request, state, physical result or communication value will provide independent confirmation. Do not begin by changing the configuration; the initial state is part of the evidence and should remain reproducible.

Controlled setup. Use the “Close the evidence loop” stage of the workflow: complete shortlisted sensors tested on actual targets and mounting with current device data and machine conditions and repeat the affected regression cases. The acceptance record should show this result: an evaluation is complete when the same representative job is tested in each candidate and differences are recorded as evidence rather than inferred from feature labels. Record initial conditions, the exact stimulus and the observation point so another learner can repeat the case without relying on your memory.

Fault challenge. Introduce or analyse “The result cannot be explained” as one bounded deviation. Inspect prediction, observation, proving action, alternative hypotheses and limitations The working interpretation is that activity occurred but the evidence is not yet transferable or reviewable. The next proving action is to have the learner defend the signal path and repeat a changed case. Change only one condition before observing the result, and preserve timestamps or measurements where timing matters.

Review and recovery. The most common trap here is treating an acknowledged message or one successful rerun as handover. After restoring the cause, repeat the normal case and at least one stop, timeout, disconnect or restart boundary relevant to this topic. Remove temporary forces and bypasses, return the model to a known state and retain the evidence that both operation and recovery are deliberate.

Explain it aloud: Why test faults and restart behavior? A defensible short answer is: Because a target, principle, range, mounting, environment, adjustment, output, wiring, input or interpretation mismatch or small target, angled pass, buildup, moisture, nearby metal, sensitivity drift, cable fault, slow edge, restart and background change can expose assumptions that never appear during ideal startup and steady operation.

Answer surface / 07

Questions people ask about Inductive versus capacitive proximity sensors

These concise answers define the operating, training and product boundaries most often missed in broad summaries. The full workflow and diagnostic table above provide the evidence behind them.

When should I use an inductive sensor?

Inductive proximity sensors are commonly used for metallic targets, subject to target size, material correction, range, mounting and environment.

When is a capacitive sensor useful?

Capacitive sensing can detect many non-metal materials and levels, but sensitivity to moisture, buildup, background and adjustment must be tested.

What should I learn first about inductive and capacitive proximity-sensor selection and diagnosis?

Start with the operating contract and evidence path: target material, size, shape, distance, orientation, speed, background, flush mounting, environment, contamination, output type, input compatibility and failure state, followed by target interaction through electromagnetic or electric-field sensing, output stage, wiring, plc input, logic decision and independent target evidence. Add advanced features only after the baseline is predictable.

How do I practise inductive and capacitive proximity-sensor selection and diagnosis effectively?

Use short cases with known initial conditions, a written prediction, one action and an observable result. Then alter a boundary or fault and explain why the evidence changed.

What counts as proof of competence?

A repeatable artifact or system result plus an explanation of the signal path is stronger than time spent, screenshots or a copied answer. Physical competence requires separate supervised evidence.

Why test faults and restart behavior?

Because a target, principle, range, mounting, environment, adjustment, output, wiring, input or interpretation mismatch or small target, angled pass, buildup, moisture, nearby metal, sensitivity drift, cable fault, slow edge, restart and background change can expose assumptions that never appear during ideal startup and steady operation.

Can browser practice replace official software or hardware?

No. It can build concepts and diagnostic reasoning. Exact firmware, I/O electrical behavior, networking, safety and commissioning require current official tools, documentation and target equipment.

How should progress be documented?

Keep the requirement, initial state, program or configuration, observed values, fault hypothesis, proving action, recovery result and a concise limitations statement.