Working on bulk material or dust extraction rather than a package conveyor? Use the dedicated suction-fan, rotary-valve, and purge PLC sequence for airflow proof, feed permission, clearout, trip, and restart logic.
A conveyor belt PLC program is built from three small pieces of ladder logic: a sealed-in start/stop rung that latches the motor on, a photo-eye rung that counts or diverts parts as they pass, and a fault rung that stops the belt on a jam. Wire those three together with proper interlocks and you have a working conveyor controller. Almost every conveyor you will ever program — from a single transport belt to a multi-zone sortation line — is a variation on that same skeleton.
This guide walks through each rung as a worked example, shows the I/O you need, and gives you timing diagrams and a state machine so you can see exactly how the belt behaves.

The I/O for a conveyor belt
Before you write a line of logic, list the field devices and which side of the PLC they sit on. A basic transport conveyor needs surprisingly little.
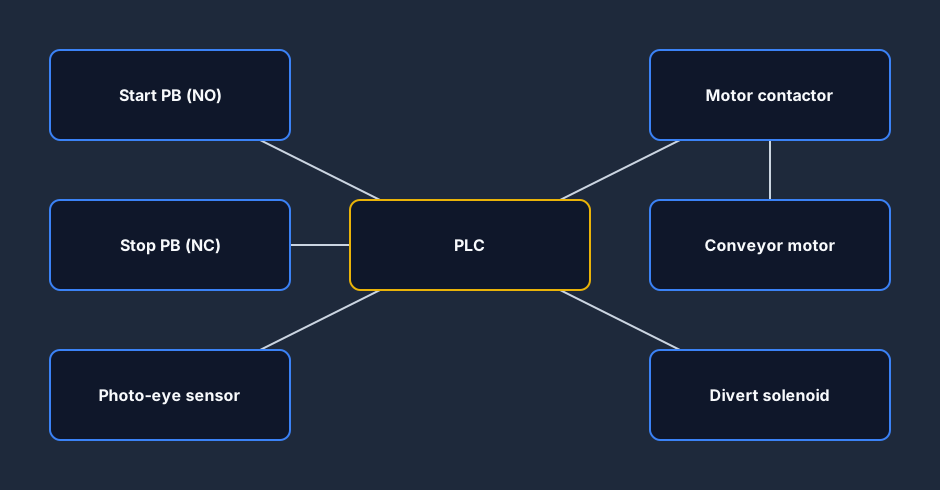
Inputs:
- Start push button — a normally-open (NO) momentary contact at
%I0.0. - Stop push button — a normally-closed (NC) contact at
%I0.1. Wiring Stop as NC is the fail-safe convention: a broken wire opens the circuit and stops the belt rather than leaving it stuck running. - Photo-eye — a through-beam or diffuse sensor at
%I0.2that goes true when a box breaks the beam.
Outputs:
- Motor contactor at
%Q0.0. The PLC never switches motor current directly; it energises a contactor coil, and the contactor power contacts feed the motor. - A divert solenoid at
%Q0.1if you are kicking parts off the line.
Keep your E-stop and guard interlocks in a hardwired safety circuit feeding the contactor — the PLC logic is for control, not for safety. The PLC rung tells the contactor when it should run; the safety relay decides when it is allowed to.
Example 1: the start/stop seal-in rung
This is the heart of every conveyor program. A momentary Start button can only be pressed for a fraction of a second, so you need the rung to hold itself on after the operator lets go. That is the seal-in (also called a latch or holding contact).
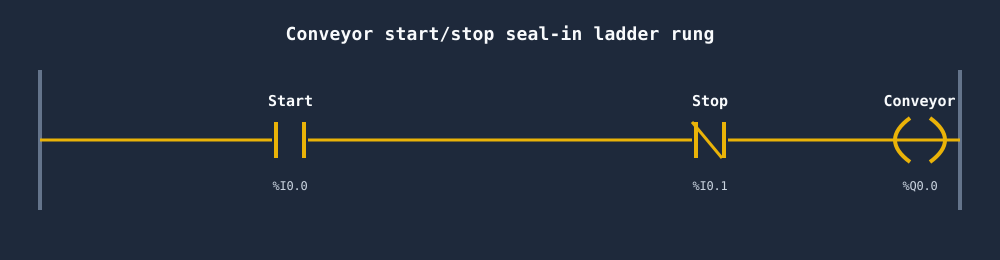
In words: the Conveyor output (%Q0.0) energises when the Start button is pressed and the Stop button is not. Once it is on, an auxiliary contact of the Conveyor output — wired in parallel with the Start button — keeps the rung true even after Start is released. Pressing Stop opens the NC contact, breaks the rung, and the seal-in drops out.
A few details that trip people up:
- The Stop contact is examined as normally-closed in the program because the field button is wired NC. With no one pressing it the input is true, so the rung passes through.
- The seal-in contact must reference the output's own bit, not the Start input. A common beginner bug is sealing in around the wrong contact.
- Put the seal-in branch around the Start contact only, so Stop still has authority to break the whole rung.
If the seal-in idea is new to you, we have a dedicated walkthrough in seal-in rungs explained that covers the latch pattern in more depth.
Example 2: counting and diverting with a photo-eye
Once the belt runs, you usually want to do something as parts go by — count them, divert rejects, or trigger a labeller. The photo-eye is your trigger.
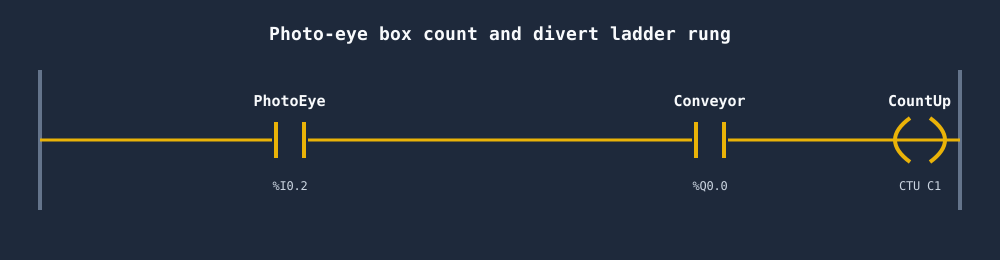
The rung reads the PhotoEye input and the Conveyor running bit, and drives an up-counter (CTU C1). Gating the count on the Conveyor bit means you only count while the belt is actually moving — you will not rack up phantom counts from someone waving a hand through the beam while the line is stopped.
The single most important refinement here is the one-shot. A photo-eye stays blocked for as long as the box is in the beam, which might be many PLC scans. If you increment the counter every scan the beam is broken, one box could register as dozens of counts. Drive the counter from a rising-edge one-shot of the photo-eye so each box adds exactly one. To divert, compare the count (or a separate reject flag) and pulse the divert solenoid for a fixed time as the part reaches the kicker.
How it behaves over time
Logic is easier to trust when you can see it on a timeline. Here is one start, a steady run, and two boxes passing the photo-eye.
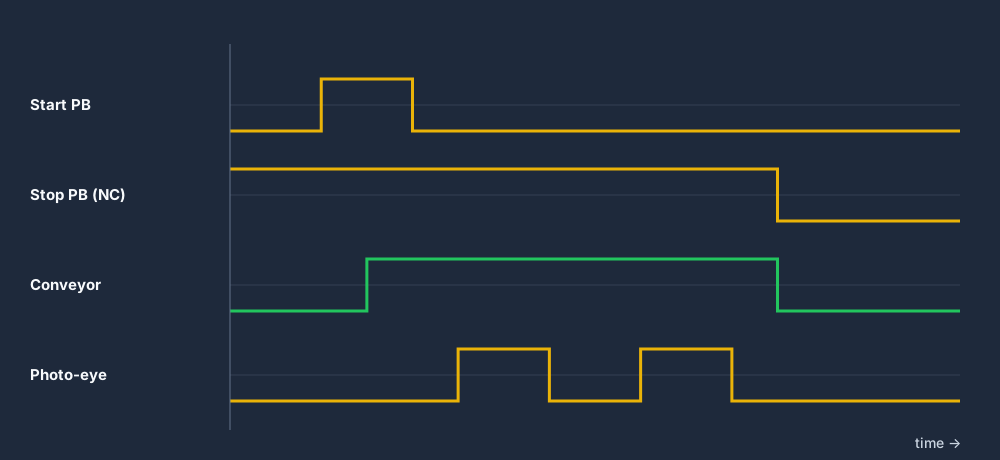
Notice that the Conveyor output goes true on the Start pulse and stays true through the seal-in long after Start drops — that is the latch doing its job. The Stop (NC) signal sits high the whole time the button is untouched; the moment it goes low at the end, the seal-in collapses and the motor de-energises. Each photo-eye pulse lines up with a part passing, and that is where your one-shot fires the counter.
The full run sequence
Put the rungs in order and the conveyor program reads as a simple sequence: confirm it is safe to run, latch on a start, run the motor, count parts, and stop on a jam or a stop request.
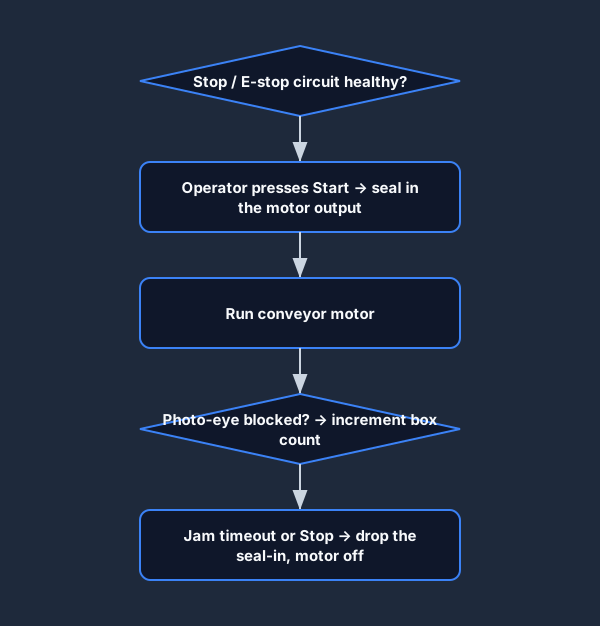
A robust program adds a jam / motion timeout: start a timer when the belt is commanded to run, and if you do not see the expected photo-eye activity (or a separate motion/encoder pulse) within the preset, drop the motor and raise a fault. Without it, a stalled belt happily sits there energised against a blocked load.
Single belt vs sortation conveyor
A single transport belt is the simplest case. As soon as you move to a sortation conveyor with multiple zones and divert points, the logic grows — but every new piece bolts onto the same start/stop and photo-eye foundation.
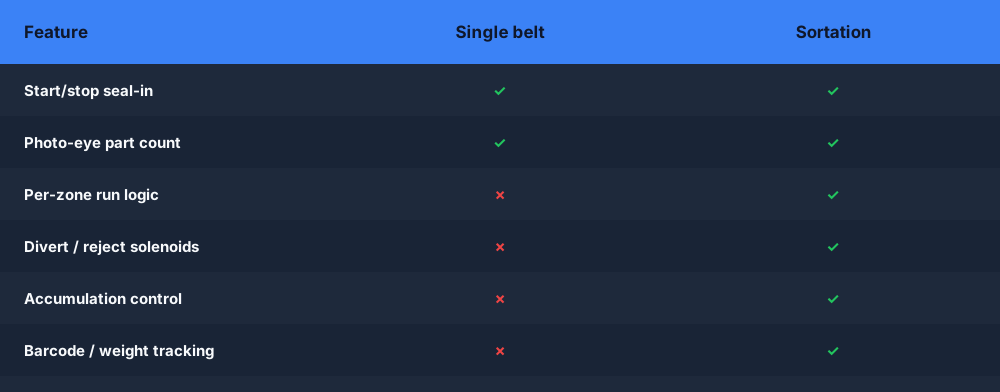
Sortation adds per-zone run logic (so a downstream stoppage backs up gracefully), accumulation control to stop zones from crashing parts together, and divert or reject outputs driven by tracking data — barcode reads, weight, or a destination set upstream. The seal-in and photo-eye patterns from the examples above still appear in every zone.
Common conveyor programming pitfalls
Most conveyor "logic faults" on a real line come back to a handful of mistakes. Run through this list before you commission.
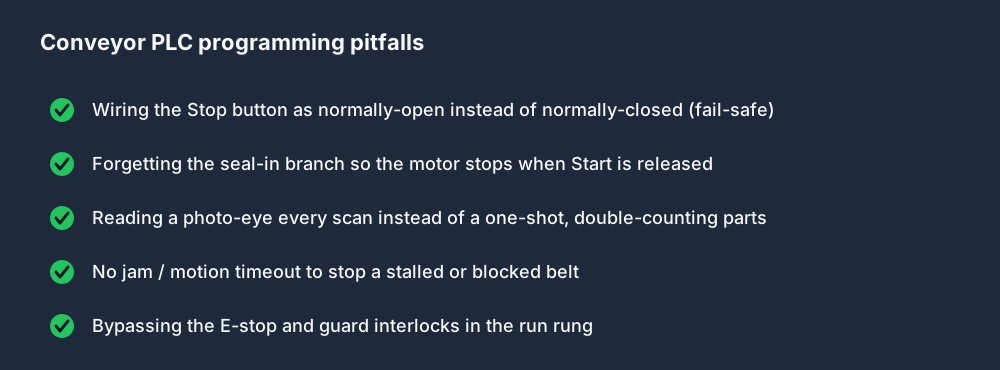
The two that bite hardest are the NC stop button (get this wrong and a broken wire leaves your belt running) and the missing one-shot on the photo-eye (which silently double-counts and ruins your throughput data).
A state-machine view of the belt
If you prefer to think in states rather than rungs, a conveyor is a tiny state machine. It sits idle, transitions to run on a start, and drops to a jam-stop fault if the motion timeout expires — from which it returns to idle on a reset.
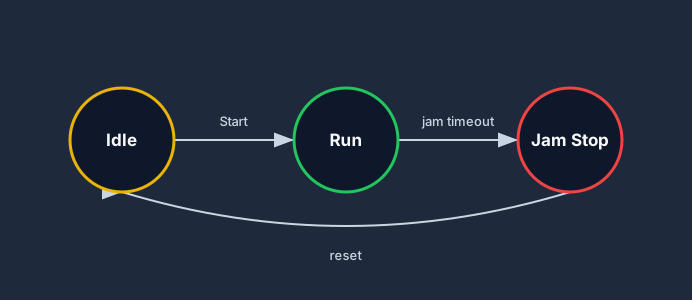
Modeling the conveyor as states first, then translating each transition into a rung, keeps larger programs tidy — especially once you have several zones each in their own state.
Build it in your browser
The fastest way to make conveyor logic stick is to wire these rungs yourself and toggle the inputs. You can build the start/stop seal-in, add a counter on a photo-eye, and watch the motor latch and drop in the free browser PLC simulator — no hardware required. When you are ready for a full machine, the conveyor and material-handling scenarios drop you into pre-built I/O so you can focus on the ladder logic.
FAQ
What ladder logic does a conveyor belt need? At minimum a start/stop seal-in rung to latch the motor on, plus the interlocks (stop, E-stop, guards). Most conveyors add a photo-eye rung to count or divert parts and a jam-timeout rung to stop the belt if it stalls.
Why is the conveyor stop button wired normally-closed? For fail-safe operation. With a normally-closed stop button the input is true while the belt is allowed to run, so a broken wire or lost connection opens the circuit and stops the conveyor instead of leaving it running with no way to stop it.
How do you count boxes on a conveyor with a PLC? Feed a photo-eye into an up-counter (CTU), gated by the conveyor-running bit, and trigger it from a rising-edge one-shot so each box increments the count exactly once instead of every scan the beam is blocked.
What is the difference between a single conveyor and a sortation conveyor program? A single belt needs only start/stop and optional counting. A sortation conveyor adds per-zone run logic, accumulation control, and divert/reject outputs driven by part-tracking data — all built on the same start/stop and photo-eye patterns.